Making the first generation (chevrons) is trivial. Moving on to the 2nd and 3rd generations can use some additional explanations.
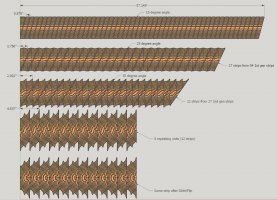
Review the first image which is a rendering I made in SketchUp to show where the cuts are to be made to make each generation.
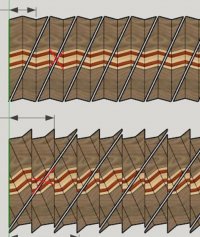
To make the 2nd generation, Lamination PRO says to cut through the declining (left) strip at 25 degrees. Lamination PRO displays this as well bit it always starts with a full repeating unit to the left. To save material, it makes sense to flip the board over as shown in the image so that the first strip is the inclining (right) strip and the full repeating unit starts after that strip. This lets you cut through the left strip so that the first cut wastes a minimum amount of wood. The point that you need to hit with the center of your saw blade is determined by the design on the first generation board’s left strip. It needs to be the horizontal and vertical center of that design. Draw two cris-crossing lines to identify that point. (Shown in the second image (red lines). I normally mark this pointon each strip where the cut is to be made.
Remember that when you glue the strips you cut from this board, you glue them together without flipping the right strips. That means that you can draw the center point starting in any strip so select where you want to start using a ruler at 35 degrees to see where to cut to waste the least wood. That strip is now the new left strip and each successive cut will skip a strip.
When you cut the strips for the thirds generation, DON’T glue them into a board. You will take each strip and cut it in half on the miter or table saw, flip it over and glue it to the other half, completing the bird design.
Please let me know if you need additional information.
Lloyd