-
I will be unable to do any shipping of hardware products including Stomper Products and Hunter Products between February 16th and March 20th. Any orders placed during that time will be processed on a first-come, first-served basis. Flash drives will continue to be mailed to US addresses only. I apologize for any inconvenience this will cause.
You are using an out of date browser. It may not display this or other websites correctly.
You should upgrade or use an alternative browser.
You should upgrade or use an alternative browser.
My Eagle Bowl attempt
- Thread starter Glenn McCarron
- Start date
Glenn McCarron
PRO Member
Lloyd, thank you so much for doing this. The simplicity of the jig blows me away. I will definitely use this method. I would have used my jig from my John Beaver bowl and adapted a pendulum to swing through on a given radius but yours is so much better. Thanks for sharing. I will not make it to the shop today but once I decide on the heads I will look at my dimensions a bit closer. I would still hope to decrease the bowl size by looking at the inside pattern and allowing a bit of space between the wingtips and then based on thickness and a bit of math I will get the final outside segment length. This will determine my bowl size. I am limited by my lathe in that my max diameter cannot exceed the 12 inches.
Glenn McCarron
PRO Member
Today I only got time to start the cleanup of the Eagles. In the end I did get the 8 required birds. As this piece is meant to be my main entry in our annual turning competion I have decided that I want to redo the complete lamination. I base this decision on the fact that I have one bird that is much smaller in the wingspan, numerous slight alignment issues and a variety of head sizes including one that is simply to small.
Alignment issue on back
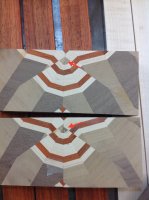
Smaller wingspan on top bird as well as the white area is much smaller
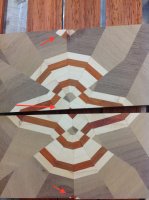
General misalignments.
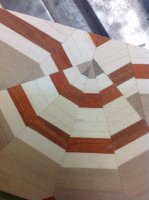
I'm not upset with the attempt and I will use these birds to practice the mitre cuts as well as trying to trim the heads off the bottom and glueing them on the top. I will also try Lloyds bandsaw jig.
I did notice on Generation 1 that I had a few chevrons that didn't quite line up perfectly so I think that was the start of the problems. My second issue that I had already mentioned was that I shorted my material very significantly otherwise I may have had a few extra birds to pick and choose from. My process I think was OK. It will take me probably about 4-5 days to get back to this level. I have all the maple and padauk milled but I will have to get back to the lumber store to get a bit of 5/4 walnut.
Alignment issue on back

Smaller wingspan on top bird as well as the white area is much smaller

General misalignments.

I'm not upset with the attempt and I will use these birds to practice the mitre cuts as well as trying to trim the heads off the bottom and glueing them on the top. I will also try Lloyds bandsaw jig.
I did notice on Generation 1 that I had a few chevrons that didn't quite line up perfectly so I think that was the start of the problems. My second issue that I had already mentioned was that I shorted my material very significantly otherwise I may have had a few extra birds to pick and choose from. My process I think was OK. It will take me probably about 4-5 days to get back to this level. I have all the maple and padauk milled but I will have to get back to the lumber store to get a bit of 5/4 walnut.
Last edited:
Glenn McCarron
PRO Member
Thank you Curly, all about the learning.
It's all a learning curve. I think you hit it when you said the first generation started the drift. It certainly doesn't take much to throw off the end pattern even on small diamonds. Thanks for showing the process.
Glenn,
Here are a few things that I do and perhaps one or more of these tips can be helpful to your workflow. You are already doing most, if not all of these, but for other viewers, this may help.
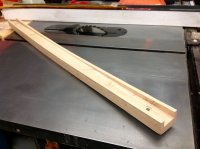
The key is to move as fast as possible and keep the glue as wet as possible so that the strips can slide into place. To do this, I use Titebond Extend which delays the set time for a few minutes. I use a clamping channel made from extruded aluminum with a fixed right angle at the lower left. The channel is three sided, open at the end. It is set to be just wide enough to match the length of the strips but is not fixed as I need to be able to apply clamping pressure on it.
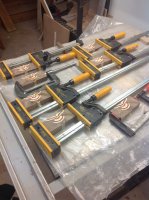
I dry fit the entire length of the glue-up. I then lay a 1" dowel along the entire length of the outside of the three channel elements and clamp against them. With the dowels in place, the clamps apply pressure at the middle of the thickness and lessens the chance of up or down bulging. I use no less than four clamps for the channel and set them all to the proper width and set them aside. I use two clamps for the length of the board. I use Bessey clamps.
For the glue-up I will only be applying glue to one side and this is purely to speed up the process. I start at the right and tip the last segment up and to the right and then I turn every other segment up and to the left. This keeps me from gluing the outside of the first and last strip. The block of all strips is now as far to the right of the channel as possible and I put a clamp to put slight pressure on the block to keep the glue from getting between the strips. I use a silicon roller to get an even spread on the top of all the segments.
Starting from the left, I lay the strips into their final position, but I don't let the surfaces to be glued touch yet. When they are all laid out, I quickly move them together put the clamps in place and snug. I then start in an alternating pattern, tightening each of the six clamps by one twist. If the glue is still wet, everything will slide right into place and the alignment should be perfect.
The final thing I do is add a clamping caul that I made from six 1/4" strips of oak that I bent around a gentle bend. This forces all segments to be forced flat.
Attachments
Last edited:
Glenn McCarron
PRO Member
Hi Lloyd. Thanks for the pointers. I like the idea of your clamping caul. I normally add one pipe clamp to the top to hold down any bulge that may form but it would not really apply the down pressure that yours will do. I did watch this closely as I wanted to maintain my thickness. I hope to cut my chevrons tomorrow and I will evaluate how I can improve my process prior to the glue. I don't understand why we cannot buy the Titebond Extend in Canada and to add insult Rockler will not ship it across the border either. So I have to work with what I have. Maybe I should put my glue in the fridge?? Would that slow the dry time?
Not sure if I'm understanding how you are using the dowels? Are they against the pointed ends of the chevrons?
Not sure if I'm understanding how you are using the dowels? Are they against the pointed ends of the chevrons?
I asked the Franklin company representative about mixing water with Titebond Original or II and he said the only thing it would do is extend the set time. I asked him if that was what they did to make the Extend product and he said yes, but it wasn't water they added. So it sounds like you could do this, but I would give it a try on scraps first. He also said that refrigeration was not recommended and that it would not extend the life of the product. Who knows if he knew what he was talking about, though.
The reason I use dowels is that parallel clamps like the Bessey products are not always parallel under pressure. Often, you can't see this but it could be happening. If you could measure the clamping power across the area that is in contact with the wood, it is likely that there will be more clamping pressure at the top or at the bottom of the contact area. If there is more clamping pressure at the bottom next to the bar, this will have the effect of creating an upward bulge after the first strip. By placing 1" dowels between the wood and the clamp transfers all of the clamping pressure to the line where the dowel contacts the wood and since you are working with ~1" wood, this would be in the center of the strip which means that there will be no bulging of the strips either up or down, regardless of how much you tighten the clamp.
The reason I use dowels is that parallel clamps like the Bessey products are not always parallel under pressure. Often, you can't see this but it could be happening. If you could measure the clamping power across the area that is in contact with the wood, it is likely that there will be more clamping pressure at the top or at the bottom of the contact area. If there is more clamping pressure at the bottom next to the bar, this will have the effect of creating an upward bulge after the first strip. By placing 1" dowels between the wood and the clamp transfers all of the clamping pressure to the line where the dowel contacts the wood and since you are working with ~1" wood, this would be in the center of the strip which means that there will be no bulging of the strips either up or down, regardless of how much you tighten the clamp.
Lloyd, this is the type of tip that I hope you include when you start producing videos again. Just like a slight misalignment on a first generation cut will make a big difference on the third, a small tip can have a big impact down the road.
Glenn McCarron
PRO Member
Attempt two is taking shape. I have planed my lamination, cut the 7/8 strips to form the chevrons. With my extra wood this time I will have to do two glue ups. I don't have enough long clamps to do both sets at once so one at a time. My dry fit went very well and everything seemed to line up better. I did the glue up moving as quickly as possible ensuring it was nice and flat as well. I do plan to make the caul that Lloyd talked about but I didn't do it for this one. I did not redo the pictures yet as it is a repeat of the same process.
Art Bodwell
PRO Member
Hi Lloyd. Thanks for the pointers. I like the idea of your clamping caul. I normally add one pipe clamp to the top to hold down any bulge that may form but it would not really apply the down pressure that yours will do. I did watch this closely as I wanted to maintain my thickness. I hope to cut my chevrons tomorrow and I will evaluate how I can improve my process prior to the glue. I don't understand why we cannot buy the Titebond Extend in Canada and to add insult Rockler will not ship it across the border either. So I have to work with what I have. Maybe I should put my glue in the fridge?? Would that slow the dry time?
Not sure if I'm understanding how you are using the dowels? Are they against the pointed ends of the chevrons?
Glenn, putting the titebond in the refrigerator definitely will not slow the dry time. My shop is about 50 degrees in the winter and the glue gets thicker and will tack faster and not slide during the clamping process. I set my glue bottle under a 60 watt bulb to warm it up in order to glue segments. I do a lot of 36 segment rings and could never get around the full ring will cold glue and still have the segments slide to align. Art
Glenn McCarron
PRO Member
Thanks Art for the info. If our dollar ever gets better I'll have to plan a trip to Woodcraft, maybe the one in Honolulu to get some Titebond Extend. Not the closest one but all about location.
Glenn McCarron
PRO Member
This time I glued up two 40" laminations. My first one came out perfect but the second one once again had a number of misalignments. I did a dry fit and all seemed good. Not sure if I am somehow skewing them with clamping pressure?? I ended up cutting it apart and putting it back together but I lost about 35% of the board. As this is extra I think I will have lots. Hope to do generation 2 cuts and glue-up tomorrow.
Glenn McCarron
PRO Member
Generation 2 cuts are done and back in the clamps. Generation 3 cuts hopefully tomorrow. Keeping my fingers crossed that this attemp goes better. One hates to waste wood at 8-10 dollars per board foot.
Glenn McCarron
PRO Member
Generation 3 cuts are done and I also split the pairs to produce the birds. This time I used my bandsaw to cut them apart in an attempt to maintain the small piece that will form the head. Seems to have helped so far. Tomorrow I will trim the sides and glue up the birds. I'll get some pictures going then as I am now caught up with my previous attempt.
Glenn McCarron
PRO Member
They look great, Glenn. Good job and now onward!
Thanks Glenn. I'm starting to see how these go together.
Glenn McCarron
PRO Member
Thanks Lloyd, I'm much happier with this round. The heads come next, but I guess you know that!

