• Are you looking for a coupon code to buy my software? You can get one from lots of 3rd party sites but they won't work. My software never goes on sale and has never been discounted. The only coupon codes that are given is when I give a club presentation and I offer a discount to the attendees. Other than that, everyone pays the same price.

Collaborative Bowl Project - Closed Segment

Yes, will start some internal turning I think as soon as this row is cured, I think I'll leave the outside until is is done. Will probably need tail stock support but I want to leave as much stock on the outside as possible for support.
Any thought out there, remember it a rookie here
 
Alignment questions, concerns. What the hell happened?
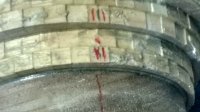
Here is the alignment marks I made on the first two rows
2016-09-26 10.14.46.jpg
Now I rotate 90 degrees and this is what I have
2016-09-26 10.15.23.jpg

This was a ring I split they should be dead nuts the same!!
Does flipping the rings cause a problem??
The segments are identical in width, off the saw run thru the wedgie sled.

I know this is a learning process, and boy am I learning. But this is a BIG disappointment.

What happened??
 
I really like the look of your bowl after your initial turning.

Alignment, I can only suspect what may have happened. I am sure there are others on the forum that have more experience and can comment.

Being 48 segments certainly makes this a difficult piece. My comments are only me thinking out loud and are certainly not to be taken as criticism. Taking a thicker piece and slicing it I would try to keep each ring in order and would not flip them. If the ring is slightly out of round I think it will cause you issues.

When making the taller ring I would want to ensure that the pieces were at 90 degrees to the base and have no lean when you glued it. Right back to the start I would make sure your segeasy sled was aligned with the back edge of the sled to the wedge to ensure that the segments are equal on both sides and not spiralling off centre ( which I'm sure they are not). Could your ring have slipped while gluing? Probably not as you used your Cole Jaws to hold it.

With any project like this I always dry fit each ring, rotate it to check every 90 degrees then mark it where I want it to be before applying the glue.

You had said you rotated 90 degrees to take the second picture. How does it match at 180 degrees? And 270 degrees?

The flipping the rings I never thought of, but that is my guess.

The pieces are 90 degrees, no problem there.
Segments stay aligned going the other direction up to 90 degrees then start going out. Pretty weird.
At first I thought my segment count might be off either 47 or 49 segments, but all rings are 48
No slippage I still line up at my alignment marks
I know I flipped the rings, because I sanded the outside flat before splitting the ring, and that ended being my glue up surface.
Well lesson learned, need to mark and really check alignment be for the glue up
 
I think this is caused when the ring isn't exactly centered. A small amount on many pieces isn't noticeable but in this case a little goes along way. On way to be sure is to align the ring off the lathe and hot glue three small bits to the prior ring to act as a guide. Then if you are using the lathe remount and glue on the ring using the guide to be certain it is centered. If you are using a One Way revolving chuck adapter you can add the pressure and then rotate the piece to be certain it is lined up.
 
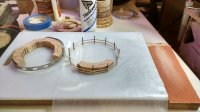
Glenn this is what I normally do for sanding the fuzzies
Segments are sitting in the hose clamp in order and proper orientation, and after counting at least twice.
As I remove the fuzzies with the sand paper on the far right I place them in between the rubber bands.
The rubber band ring is bigger than the final diameter of the ring.

2016-09-26 14.55.23.jpg
I keep the segments close to me which leaves a gap up on the top side when I have them all inside the rubber bands.

2016-09-26 15.06.54.jpg
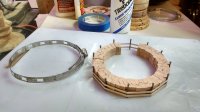
I have wax paper under the ring, and in the first picture you can see the longer tail of the wax paper on the front side running off the jig. This is where I pour a pool of glue. I use the dip method, dipping one side of the segment into the glue and then putting in place, doing this the 47 time and then the last one gets dipped on both sides. The nails are then pulled and ring is then only held by the rubber bands. Then the hose clamp in slipped over and partially tighten and the segments are pushed into as close alignment. The whole group in then pulled from the wax paper which is no a big puddle of glue and the wax paper is thrown away. I then put in in new wax paper and into the press, give it the big squeeze, open it, tighten the hose clamp tight now, back in the press and squeeze it once more. Take it out check it pull off the wax paper and use paper towel to remove the excess glue. Done for now

2016-09-26 15.43.35.jpg

layers 8,9,10 &11
I'll be sure not to flip these and make a index from one to the other. Once I have them split I'll post those pictures before I glue them on
 
Before you slice them mark the edge of one segment with a Sharpie to keep them together. Did you measure the diameter in a few different places to see how close you are? They certainly look good. If it is out of round at all it might be better to position the ring how Stuart suggested.

I wish I could make the larger rings and slice it like that, would certainly speed things up when I get started again.
 
Yes that's the plan both of these rings are the same so I will even us different colors when I mark them
 
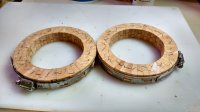
Two rings become four rings, did not try to get the third out of these. Rings are round within 1/32

2016-09-26 17.34.09.jpg
 
I wish I could make the larger rings and slice it like that, would certainly speed things up when I get started again.

Glenn you can just make two bowls at the same time, one ring will make a layer for each bowl. I thick it is REALLY worth thinking about
 
In your picture of the glue up it looks like the outer edges are not aligned with each other. This may be part of your problem especially since you split the glue up and flipped the resulting pieces.
 
In your picture of the glue up it looks like the outer edges are not aligned with each other. This may be part of your problem especially since you split the glue up and flipped the resulting pieces.

Yes Tom I think the lower rings were out of round also, which did not help anything. Live and learn
 
Much better, next ring I'll use a magnifying glass. with the rougher outside of the unfinished segments it looks like its in line, but when turned you see it is out by a hair. Maybe I'm getting too picky after my first rows are out, but lets get it closer. Those little pieces are a bear
 
Glenn found a way to extend your glue up time a little. Even with Titebond II extend I was getting a couple of segments that were starting to set up by the time I had gotten all the way around the 48 segment ring. Today I took and dabbed each side of the segment on a every damp sponge and then applied the glue t one side of the segment and then put it in place. Seemed to work well, give you a little more open time.
 
Bob, how long are you talking about for the segments to start setting up? I've found they can start to get tacky and still be fine once pressure from a clamp or in my case a zip tie is applied.
 
Back
Top