In his book The Art of Segmented Woodturning, Malcolm Tibbets presents a project named John's Turning that has detailed instructions to make an Indian Blanket design using the stacked wood method. This design has become iconic in that there have been hundreds of pictures posted of bowls made using his instructions. This book should be the first book every segmented woodturner should get. Here is a picture of John's Turning, showing the Indian Design feature ring:

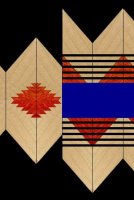
It is possible, though, to make a nearly identical design using a multi-generation lamination approach, and using the SW Design View in Lamination PRO, here is what it should look like:

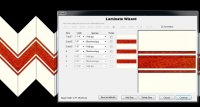
This design is made by simply cutting a first generation board into identical strips and gluing them back together. First, start by making a seven strip symmetric board and cut it into 1-1/2" strips at 45 degrees:

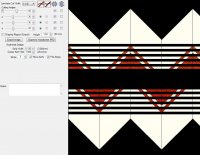
Next, switch to the SW Design View and add a strip width of .12", center kerf of 1", select 5 for the number of strips you'll cut from the top and bottom and then click the 'Show kerfs' button and your screen should look like this:

To simplify the cutting process, the 1st generation board should be exactly 6.8" from to top 'ear' to the bottom ear. You need to remove a 1" strip from the exact center of the board. Subtract 1.0" from 6.8" giving 5.8" divided by 2 giving 2.9". Move your fence exactly 2.9" away from the blade and put the ears on one side of your board against the fence and make your first cut. Now rotate the original board so that the remaining ears are against the fence and make the second cut.
You should now have two identical boards, each with ears. Next, use your favorite (and safest) method of cutting thin strips using a 1/8" saw blade, cut five strips from each board that are .12" wide (1/8" will work fine but will give a slightly imperfect design). My preferred method for doing this is using a Grr-Ripper with a 1/8" leg that holds the cutoff to the table and a sacrificial wooden stop at the end to pull the cuttoff through the blade to prevent a potential kickback.
Cut a final strip from each board (which should now be just holly) at whatever width you like to give you a solid border for the top and bottom of the Indian Design pattern. Depending on your design, it might be safer to just glue the boards with the ears together with your strips and after the glue dries, cut away the ears leaving your desired pattern width.
You should now have a long board with design elements that are approximately 1.5" tall and 3" wide. It is always a good idea to make a few extra design elements.
I've attached the file I used to create the design that you can save to your disk and open in Lamination PRO.
Please let me know if you have any questions. For an additional tutorial on cutting strips, gluing, and other topics on making SW Designs, read my SW Design tutorial by clicking http://woodturnerpro.com/software-t...o-tutorials-multi-generation-laminations.html.
Lloyd Johnson

It is possible, though, to make a nearly identical design using a multi-generation lamination approach, and using the SW Design View in Lamination PRO, here is what it should look like:

This design is made by simply cutting a first generation board into identical strips and gluing them back together. First, start by making a seven strip symmetric board and cut it into 1-1/2" strips at 45 degrees:

Next, switch to the SW Design View and add a strip width of .12", center kerf of 1", select 5 for the number of strips you'll cut from the top and bottom and then click the 'Show kerfs' button and your screen should look like this:

To simplify the cutting process, the 1st generation board should be exactly 6.8" from to top 'ear' to the bottom ear. You need to remove a 1" strip from the exact center of the board. Subtract 1.0" from 6.8" giving 5.8" divided by 2 giving 2.9". Move your fence exactly 2.9" away from the blade and put the ears on one side of your board against the fence and make your first cut. Now rotate the original board so that the remaining ears are against the fence and make the second cut.
You should now have two identical boards, each with ears. Next, use your favorite (and safest) method of cutting thin strips using a 1/8" saw blade, cut five strips from each board that are .12" wide (1/8" will work fine but will give a slightly imperfect design). My preferred method for doing this is using a Grr-Ripper with a 1/8" leg that holds the cutoff to the table and a sacrificial wooden stop at the end to pull the cuttoff through the blade to prevent a potential kickback.
Cut a final strip from each board (which should now be just holly) at whatever width you like to give you a solid border for the top and bottom of the Indian Design pattern. Depending on your design, it might be safer to just glue the boards with the ears together with your strips and after the glue dries, cut away the ears leaving your desired pattern width.
You should now have a long board with design elements that are approximately 1.5" tall and 3" wide. It is always a good idea to make a few extra design elements.
I've attached the file I used to create the design that you can save to your disk and open in Lamination PRO.
Please let me know if you have any questions. For an additional tutorial on cutting strips, gluing, and other topics on making SW Designs, read my SW Design tutorial by clicking http://woodturnerpro.com/software-t...o-tutorials-multi-generation-laminations.html.
Lloyd Johnson


