• Are you looking for a coupon code to buy my software? You can get one from lots of 3rd party sites but they won't work. My software never goes on sale and has never been discounted. The only coupon codes that are given is when I give a club presentation and I offer a discount to the attendees. Other than that, everyone pays the same price.

Lamination Pro Project

Glenn McCarron

PRO Member
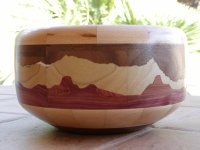
For my next proposed segmented project I need to do a feature ring. In that feature ring I would like to do a ring of Maple Leaves. To make my life easier I would like to use Lamination Pro to make the leaf design. ( I am hoping that Lloyd reads this and figures out a way to import a picture and have Lamination Pro spit out the design in mere seconds. In the next few weeks. Just joking.) I will certainly try to do the design myself but I thought I would throw it out there to see if anyone else has tried to do this (or succeeded) or have any suggestions as to how I would do this. I have attached a picture. I do not mind slight changes like the corners being sharp instead of rounded but all the points have to remain. I would think the finished height would be around 2 to 2.5 inches tall.

Any suggestions would be greatly appreciated.

canada-flag 1.jpg
 
If you have a scroll saw I have an idea for you. I did this a few years ago. Hopefully I can explain the process.

- Prepare two contrasting strips of wood (maple and walnut for example) that are the width of your segment (2 to 2.5 inches tall, and a length a inch or two longer than your segment length needed). The thickness of the board strips should be a bit more than what you will need to cover the rounding. 1/2 to 3/4 thick?)
- Print out your pattern of the leaf and glue them onto on of the strips.
- Stack the two strips one on top of the other. Tack them in place using two sided tape or hot glue
- scroll saw out your pattern
- separate the strips
- take the leaf from the light color wood and glue in place into the dark color strip. (you can then take the dark color leaf and place it in the light color background strip).
- Sand flat, and cut your segment angles.
(It is stack cutting with a scroll saw). You have to cut very slow to avoid having the blade bend.

Attached is a landscape bowl I did in 2012
 

Attachments

  • swlandscape 1.JPG
    swlandscape 1.JPG
    854.9 KB · Views: 22
If you have a scroll saw I have an idea for you. I did this a few years ago. Hopefully I can explain the process.

- Prepare two contrasting strips of wood (maple and walnut for example) that are the width of your segment (2 to 2.5 inches tall, and a length a inch or two longer than your segment length needed). The thickness of the board strips should be a bit more than what you will need to cover the rounding. 1/2 to 3/4 thick?)
- Print out your pattern of the leaf and glue them onto on of the strips.
- Stack the two strips one on top of the other. Tack them in place using two sided tape or hot glue
- scroll saw out your pattern
- separate the strips
- take the leaf from the light color wood and glue in place into the dark color strip. (you can then take the dark color leaf and place it in the light color background strip).
- Sand flat, and cut your segment angles.
(It is stack cutting with a scroll saw). You have to cut very slow to avoid having the blade bend.

Attached is a landscape bowl I did in 2012
That is a great suggestion Mike. I do have a scroll saw. With this type of design do you think the leaf will fit snuggly into the other wood as the kerf (all be it small) would be completely around the leaf. I could envision tilting the table maybe .5 of a degree and cutting around in one direction could result in a plug type fit???? Might make it nice and tight. A test cut might prove this theory. Not sure how thick of hardwood my scroll saw would handle.
 
I didn't tilt the table, but some scroll saw sites suggest what you stated. Tilt for a very tight fit. The saw kerf is not much of an issue if you use very thin blades.
The thicker the wood the harder it is to keep the cut square. The blade can tend to drift at the bottom in thicker pieces.
 
I didn't tilt the table, but some scroll saw sites suggest what you stated. Tilt for a very tight fit. The saw kerf is not much of an issue if you use very thin blades.
The thicker the wood the harder it is to keep the cut square. The blade can tend to drift at the bottom in thicker pieces.
Thanks Mike. I think your idea is a good one and I will probably try a test cut and let you know. Might be mid week next week before I get to it. We're looking at 12-14 inches of snow and high winds starting here in the next few hours. What we call a Nor' Easter. It's the worst!
 
May I suggest a modification to Mike’s procedure? This is an Intarsia scroll saw technique. Make yourself your patterns, I photo copy them, you’ll need twice the number of patterns than the number of segments. Cover your pieces with packaging tape (this protects your wood and is a lubricant for the scroll saw blade) then spray them with 3M Super 77 and attach your pattern. Your maple leaf will be bloodwood or something like that. Now here it the trick set your scroll saw blade at 1 or 2 degrees out of 90. Now cut out your pieces VERY carefully. You need to go around your pattern in one direction and both pieces need to be cut in the same direction. When you have both pieces cut, your leaf will slide into the segment from the topside and because of the angle of the blade and the width of the blade it will sink into the segment piece. You can play with the angle of the blade and use very thin blades, minimize how much it this happens. The advantage is there a wedge fit which will mitigate any gap from cutting error. If your colored wood is thin enough you could stack the woods like Mike suggested and then your parts match almost perfect. Again go very slowly so you do not flex the blade.
 

Attachments

  • bikie1-(secnd Download).pdf
    1.1 MB · Views: 14
May I suggest a modification to Mike’s procedure? This is an Intarsia scroll saw technique. Make yourself your patterns, I photo copy them, you’ll need twice the number of patterns than the number of segments. Cover your pieces with packaging tape (this protects your wood and is a lubricant for the scroll saw blade) then spray them with 3M Super 77 and attach your pattern. Your maple leaf will be bloodwood or something like that. Now here it the trick set your scroll saw blade at 1 or 2 degrees out of 90. Now cut out your pieces VERY carefully. You need to go around your pattern in one direction and both pieces need to be cut in the same direction. When you have both pieces cut, your leaf will slide into the segment from the topside and because of the angle of the blade and the width of the blade it will sink into the segment piece. You can play with the angle of the blade and use very thin blades, minimize how much it this happens. The advantage is there a wedge fit which will mitigate any gap from cutting error. If your colored wood is thin enough you could stack the woods like Mike suggested and then your parts match almost perfect. Again go very slowly so you do not flex the blade.

Thanks for this Bob. All great suggestions. I would not have thought to use the packing tape. I did realize that I would need to go in one direction. If I go with thinner wood I can probably do both boards at once. Thicker wood would not work this way. I have not planned the actual bowl yet to get the segment size or thickness to handle the curve of the bowl. I think 3/4 would be a target thickness. I could always laminate the finished leaf and not have it show on the inside wall but I'm thinking I would want it all the way through. To start the cut would you split your background piece or would you use a fine drill hole to thread the blade?
 
Here is a picture of what I ended up from the attached PDF
IMG_20170107_125817438.jpg
I would drill a hole.
Your going to want to do it the opposite way from this. You'll end up with your leaf sinking into your wood. Which will actually help you as far as thickness. When you turn it you'll be knocking off the outer edges of the segment before you get to the leaf, so you'll be saving thickness on the leaf part. But it will be opposite on the inside depending on the difference in the the thickness of the two woods. But if the segment section is thicker than the leaf part you could end up with the same knocking off the segment ends before hitting the leaf section and the leaf would then be flush both inside and out.
 
Back
Top