• Are you looking for a coupon code to buy my software? You can get one from lots of 3rd party sites but they won't work. My software never goes on sale and has never been discounted. The only coupon codes that are given is when I give a club presentation and I offer a discount to the attendees. Other than that, everyone pays the same price.

Feature ring construction

rtaylor

PRO Member
I need some advice on construction of, and, cutting segments for a feature ring. Although I have done this lamination before, I think I am making it more difficult than it needs to be so I thought I would ask how some of you do it. I use a Dubby sled for cutting segments and have found it to be extremely accurate. When it comes to feature rings that require each individual segment to be cut as a single segment rather than cutting from a strip things get a little more difficult. Before I get to that point in construction however what is the best way to cut a second generation with extreme accuracy in the following example....Capture 2 gen.PNG I find that using my equipment is very difficult to hit the same position each time, especially when you are using the points of the lamination to run along a miter fence. In this next example image, the desired feature is achieved and now they need to be cut apart at correct angle cut for segmenting.Capture 3 gen.PNG I have been cutting the repeating units apart with a band saw then cutting the angle on each individual segment. The ring is 2.25 inches tall so holding that piece and cutting it with a sled and the table saw gets pretty dicey...Anyone who has advice or methods please let me know. I could sure use some help.
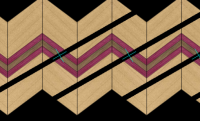
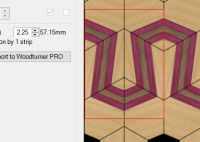
 
I usually glue my strips together to make the next generation board until I get to the last generation and then I glue just the repeating unit (2 strips) together which gives me the correct width. I then crosscut these repeating units either with my Dubby or a miter saw to get the correct height. Finally, I stand them up on end so that I can cut the angles which I also do either with my Dubby or on the miter saw. You can pretty much count on having to make the feature ring in halves, but I seldom have to remove much wood to make the two halves fit together.

With regards to cutting a generation board into strips for the next generation, I've tried a lot of different methods and if you're really careful, they all work reasonably well. I usually come back to the same method, though, where I put a piece of sacrificial wood on the fence of my Dubby at the desired angle and then cut through the board but stop before cutting all the way. I then pull the board back without moving the wood and then use a laser on a gooseneck with a magnetic base and position the laser so that it points straight down through the saw kerf. This shows me a spot that is perfectly centered on the blade. I then put the generation board on the Dubby and slide the sled and slide the board until the laser is perfectly centered over the mark and yes, I do mark each repeating unit with a mark.

The next thing, though, and where most of the errors come, is gluing the strips together and keeping them both flat an in a perfect line so that when the board is completely glued together and turned up on its jagged edge, each jagged edge touches the table of the table saw.
 
I usually glue my strips together to make the next generation board until I get to the last generation and then I glue just the repeating unit (2 strips) together which gives me the correct width. I then crosscut these repeating units either with my Dubby or a miter saw to get the correct height. Finally, I stand them up on end so that I can cut the angles which I also do either with my Dubby or on the miter saw. You can pretty much count on having to make the feature ring in halves, but I seldom have to remove much wood to make the two halves fit together.

With regards to cutting a generation board into strips for the next generation, I've tried a lot of different methods and if you're really careful, they all work reasonably well. I usually come back to the same method, though, where I put a piece of sacrificial wood on the fence of my Dubby at the desired angle and then cut through the board but stop before cutting all the way. I then pull the board back without moving the wood and then use a laser on a gooseneck with a magnetic base and position the laser so that it points straight down through the saw kerf. This shows me a spot that is perfectly centered on the blade. I then put the generation board on the Dubby and slide the sled and slide the board until the laser is perfectly centered over the mark and yes, I do mark each repeating unit with a mark.

The next thing, though, and where most of the errors come, is gluing the strips together and keeping them both flat an in a perfect line so that when the board is completely glued together and turned up on its jagged edge, each jagged edge touches the table of the table saw.[/QUOT
Lloyd, thanks for the advice. Have you found a laser that has a long goose neck on it? Also the one that I found....as a lot of them tend to be...seems fuzzy and hard to definitely pinpoint the exact laser dot.
 
Thanks for the advice Lloyd. Just to be clear you are using a frame to glue the chevrons so that the points are in exact line. Then you use the Dubby with a laser to cut the second generation. At this point you glue just the repeating units separately, square them up and angle cut them for a ring. What are you using for a laser. I found a light holder at Rockler but the gooseneck is kind of short and my "flashlight" laser is hard to pinpoint the exact dot as it is kind of fuzzy....as a lot of them are if you are just looking for a point instead of a line.
 
Thanks for the advice Lloyd. Just to be clear you are using a frame to glue the chevrons so that the points are in exact line. Then you use the Dubby with a laser to cut the second generation. At this point you glue just the repeating units separately, square them up and angle cut them for a ring. What are you using for a laser. I found a light holder at Rockler but the gooseneck is kind of short and my "flashlight" laser is hard to pinpoint the exact dot as it is kind of fuzzy....as a lot of them are if you are just looking for a point instead of a line.

Yes, I do use a frame while gluing strips together to form the next generation. I have a fixed right angle at one end so that the strips will be perfectly perpendicular to the the long edge. I put glue on the strips and then put them in the channel so that the glued edges are not touching. Once they are all in place, I begin assembling them. I add the top channel member and a waste block at the end of the strips and begin tightening from the ends and across the channel, rotating as I go. Once everything is tight, the next generation board should be close to perfect.

BTW, I use Titebond Extend which gives more set time to allow for snags that usually occur during this process. If you cannot get Titebond Extend, adding a little water to Titebond Original or II will also give you more set time and, according to the Titebond representative in my area, will not affect the glue in any way other than to slow down the drying.

With regards to the laser, the one I use is one I bought a number of years ago. I took a penny and drilled a small hole in it to give me a finer dot and so far, it has worked well for me. When I get the chance, I'm going to do more research on finding a laser with either a cross hair or a fine dot and will update you if I have any success.
 
Back
Top