Brent Dalrymple
PRO Member
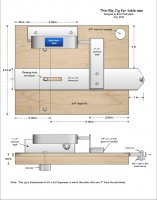
I needed a better thin rip jig to use with the southwestern feature in Lamination Pro, so I designed and built the one shown in the photo and diagram attached. Here are a few notes on construction:
1. This jig is dimensioned for the Jet Supersaw, on which the miter slots are 7 inches from the saw blade. Many table saws have different slot to blade distances, so the dimensions should be changed accordingly.
2. The digital gauge I used is the iGaging Snap Depth Gauge ($19.95 from amazon.com), but a dial indicator or even a tire tread depth gauge would work as long as its range is at least 0-3/4” or so. Any strip thicker than ¾” can be safely ripped with the strip between the fence and the saw blade using a good “pusher”.
3. The aluminum stock originally came from the local Home Depot. I used the stock I happened to have on hand so the 1.5” wide bar may be a bit of overkill, but it works nicely. The 1” x 1” aluminum angle supports the iGaging digital gauge along nearly its full length with the mounting hole placed just right and a couple of washers used as spacers between the gauge mounting hole and the angle.
4. The miter bar is from the Rockler Miter Bar Hardware Kit (#26993, $7.99 plus S&H), which includes 2 bars, two clamping screws, two clamping knobs, and two washers. I drilled holes near the ends of the bars and countersinked the holes for a #8-32 FHMS so the bar is firmly attached to the plywood board using the two #8 FHMSs and Nyloc nuts. This means that you don’t have to worry about whether or not the jig is perpendicular to the saw blade.
5. I used a small metric bearing, metric machine screw, and metric Nyloc nut but any small bearing will do. I suggest the OD of the bearing should be no more than about an inch.

")