Don Sepulveda
PRO Member
Hello All,
When I get into something, I jump in with both feet. After struggling through making a bowl or two through drawing, calculating, and attempting to line things up, I bought the software suite and decided to design things. I thought it would be interesting to talk about the process as I move through the design and production as a newbie.
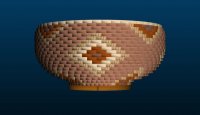
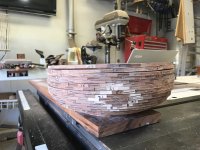
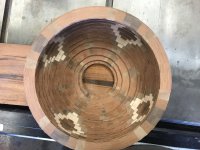
In this bowl I decided to experiement with thin rings as they would seem to provide smoother transitions between colors and shapes than if I had used thicker rings. I am using 1/4" thick closed segment rings of 48 segments. This gives me about 960 segments in 21 rings in the bowl. An ambitious undertaking for a new guy but you have to jump in sometimes.
The choice of a color pallette was interesting. I liked the different shades of brown on one of the pallettes so I used that rather than redifining a new pallette. I had to make some species adjustments due to what was available.
This was a learning process with the software. The ratioed fill option really helps. I was trying to do it individually due to some uniformity issues I was having but I finally figured it out and found it pretty easy overall.
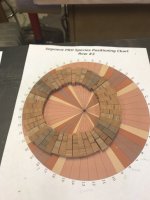
I have cut and layed out the first four segmented rings with the help of the printout from Segment Pro. When I look at this I cannot help but imagine the headache of doing this without the software.
As I do with all of my projects, I am mapping out the stages before I begin them. This first stage of cutting and glueing the rings is interesting. For the other projects, I cut all the segments and formed the rings prior to glueing. However, I do not have the space in my 2-car attached woodshop to lay out 48 rings at one time. Therefore, I am going to cut a couple of rings then glue them up, then cut the next round. One of the challenges I see right off the bat is glueing the thin rings. Normally I would use a hose clamp, but these are 1/2" think. This will definitely be a problem in glue up. Looking in YouTube, I ran across another segmenter, Earl, who has a YouTube channel where he uses a clamping system consisting of cord and a block of wood. I think this would work better as a clamp. I made one of these so it will take a little longer but I think it would work better than the normal hose clamp.
As I move through this, I thought I would use this thread to talk about the trials and tribulations of a new segmenter with a more advanced project. I am attaching an image of the proposed finished bowl and two images of the first four rings layed out. Excuse the dust, I have been down with the bug this past week and have not had a chance to clean up after cutting the initial segments.
For assembly, I will be using . a Stomper (a great tool) on my homemade Longworth chuck (another great tool).
One of the great things about this forum is seeing the feedback from others. If you have thoughts please share them.
When I get into something, I jump in with both feet. After struggling through making a bowl or two through drawing, calculating, and attempting to line things up, I bought the software suite and decided to design things. I thought it would be interesting to talk about the process as I move through the design and production as a newbie.
In this bowl I decided to experiement with thin rings as they would seem to provide smoother transitions between colors and shapes than if I had used thicker rings. I am using 1/4" thick closed segment rings of 48 segments. This gives me about 960 segments in 21 rings in the bowl. An ambitious undertaking for a new guy but you have to jump in sometimes.
The choice of a color pallette was interesting. I liked the different shades of brown on one of the pallettes so I used that rather than redifining a new pallette. I had to make some species adjustments due to what was available.
This was a learning process with the software. The ratioed fill option really helps. I was trying to do it individually due to some uniformity issues I was having but I finally figured it out and found it pretty easy overall.
I have cut and layed out the first four segmented rings with the help of the printout from Segment Pro. When I look at this I cannot help but imagine the headache of doing this without the software.
As I do with all of my projects, I am mapping out the stages before I begin them. This first stage of cutting and glueing the rings is interesting. For the other projects, I cut all the segments and formed the rings prior to glueing. However, I do not have the space in my 2-car attached woodshop to lay out 48 rings at one time. Therefore, I am going to cut a couple of rings then glue them up, then cut the next round. One of the challenges I see right off the bat is glueing the thin rings. Normally I would use a hose clamp, but these are 1/2" think. This will definitely be a problem in glue up. Looking in YouTube, I ran across another segmenter, Earl, who has a YouTube channel where he uses a clamping system consisting of cord and a block of wood. I think this would work better as a clamp. I made one of these so it will take a little longer but I think it would work better than the normal hose clamp.
As I move through this, I thought I would use this thread to talk about the trials and tribulations of a new segmenter with a more advanced project. I am attaching an image of the proposed finished bowl and two images of the first four rings layed out. Excuse the dust, I have been down with the bug this past week and have not had a chance to clean up after cutting the initial segments.
For assembly, I will be using . a Stomper (a great tool) on my homemade Longworth chuck (another great tool).
One of the great things about this forum is seeing the feedback from others. If you have thoughts please share them.