Segmented Bowl with Chevron

  • Thread starter Steven A Nicholson
  • Start date
S

Steven A Nicholson

Guest
I don't know if this is the correct forum but a couple days back I tried to make a chevron for a segmented bowl. I cut the chevron design, then glued them all back together into one long board with a chevron pattern, I trimmed the edges then cut the segments; the chevron was a mess. what was my mistake?
 
The way I make chevrons is to design the in Lamination Pro. The width of the strips is adjusted so the "repeating unit" length is as close as possible to the segment edge length needed. (ex. 1/2 strips glued together results in a segment that would have a 1" SEL.

When I make chevrons I do not glue the cut strips back into one long board. I just make pairs that form the chevron.

Cut your laminated board into the correct strip length. Group them into pairs. Flip the left hand strip left to right to form the chevron. Glue the strip pairs together. Take care to align the strips to get a clean looking chevron.

Next set up your table saw so you can trim the chevrons to the correct segment height by removing the top and bottom dog ears.

The last step is to cut the required miter angle for your segments. The attached Incra pdf shows how to cut individual segment angles.
 

Attachments

  • segmented_ring_jig_08.pdf
    501.5 KB · Views: 215
The way I make chevrons is to design the in Lamination Pro. The width of the strips is adjusted so the "repeating unit" length is as close as possible to the segment edge length needed. (ex. 1/2 strips glued together results in a segment that would have a 1" SEL.

When I make chevrons I do not glue the cut strips back into one long board. I just make pairs that form the chevron.

Cut your laminated board into the correct strip length. Group them into pairs. Flip the left hand strip left to right to form the chevron. Glue the strip pairs together. Take care to align the strips to get a clean looking chevron.

Next set up your table saw so you can trim the chevrons to the correct segment height by removing the top and bottom dog ears.

The last step is to cut the required miter angle for your segments. The attached Incra pdf shows how to cut individual segment angles.
 
Many thanks, I understand now. Also use a Incra Sled, several months back I purchased their miter gauge adjustable to 1/10 degree, huge improvement. S
 
Many thanks, I understand now. Also use a Incra Sled, several months back I purchased their miter gauge adjustable to 1/10 degree, huge improvement. S

I have the Incra Miter express sled along with a incra miter gage adjustable to 1/10 and one that is 1degree notched. On a side note. With the T-slots in the incra miter express sleds you can set up two fences, turning the sled into a segeasy cut sled.

Title: Wedgies
 

Attachments

  • incra sled segeasy.jpg
    incra sled segeasy.jpg
    64.5 KB · Views: 68
I like segeasy sled, my problem is if I don't use a hold down clamp the saw blade will pull or push the work piece causing a davit in the segment if I try to hold by hand.
 
Is your davit in the segment the part cut off or the stock piece in the jig the longer piece?
 
The imperfection occurs on both pieces, depending on the angle of grind on the saw blade teeth it will either push or pull the work piece a tiny bit. i had my saw filer flatten the angle that helps a lot, but a hold down clamp is the best.
 
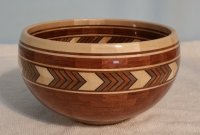
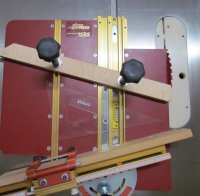
Okay, I understand the system you've described for cutting segments to align grain. Now, does that system work with a Chevron design? I just set up a chevron on a flat configuration such that each chevron was absolutely perfectly aligned with it's neighbor. I cut off the dog ears on both sides and started cutting the bevels. If I set the newly cut, angled pieces together, the outside would line up while the INSIDE was a mess. Totally off line and looking horrible. I was using an Incra 1000 do do the angles with, and they are accurate. It requires flipping each piece.

So, should I "Flip" cut a sliver to set the angle, and flip again to cut to the correct width? I've probably not expressed that question too clearly, but this is the second ring I've tried to make and I'm weary of wasting wood. A little help please.

thanks
 
Thought about it and went out and tried it on a piece of scrap. My problem had been that even though I'd set up absolutely perfect chevrons, when I cut their bevels, I didn't account for the LOSS of wood and the alteration to the pattern. The chevrons simply didn't line up on the inside anymore.

I have a "Stock" piece drying even as we speak which I will cut into chevrons and trim the Dog Ears off. I'll glue them into small sets, as you recommended, cut the bevel on one end, flip it to cut the bevel on the other end. Then I'll trim the next piece to fit. I'll read your PDF file a couple more times and make sure I understand what I believe I hear you saying.

More later.
 
I have bough the whole package, from Lloyd and did the training and that was several years ago and have never been able to figure out how to use this software. I'm not great at computers but fairly good at woodworking. I have tried to follow the videos but the mouse moving so quick makes it difficult to follow very frustrated. right now just trying to make a chevron2
 
I have bough the whole package, from Lloyd and did the training and that was several years ago and have never been able to figure out how to use this software. I'm not great at computers but fairly good at woodworking. I have tried to follow the videos but the mouse moving so quick makes it difficult to follow very frustrated. right now just trying to make a chevron2
I take it that "this software" is Lamination Pro.
Making a Chevron is one of the simplest things to do with LP.

What questions do you have?
 
I take it that "this software" is Lamination Pro.
Making a Chevron is one of the simplest things to do with LP.

What questions do you have?

I take it that "this software" is Lamination Pro.
Making a Chevron is one of the simplest things to do with LP.

What questions do you have?
LP might be easy after you understand how it works but for me following the video has been my challenge. My eye keeping up to where the cursor is going is where I struggle. It would be better it the took the cursed and made it a highlighter color so easier to follow. Moves so fast its difficult to follow. I find this my biggest problem with wat hi g all the videos with this software.
 
LP might be easy after you understand how it works but for me following the video has been my challenge. My eye keeping up to where the cursor is going is where I struggle. It would be better it the took the cursed and made it a highlighter color so easier to follow. Moves so fast its difficult to follow. I find this my biggest problem with wat hi g all the videos with this software.
ok, I understand the vids are hard for you to follow. You could send Lloyd an email. He does offer one on one on line training.

Lamination Pro
The first thing you do in lamination pro is to set your lamination dimensions in the lamination wizard. You can have up to 11 strips.
you select the width and the species for the strip.

When done with the specifications of the laminate, select continue.
That will take you to what your lamination looks like

What is important at this point is the First cut width should be set so the repeating unit is as close to the segment edge length for the ring you are wanting to build.
The black lines show the saw lines at the angle set for the first generation cut. (example 30 degrees)

1758205950866.png
 
The next step would be to click on the Gen 1 button. This will show what the laminate will look like if you cut it at 30 degrees (or whatever angle you set), flip the left strip left to right. to form the chevron. I like to just glue up the pairs and then cut them to make the individual segments that form the ring.


1758206268884.png

If you have not discovered there is some written instructions under LP help and not just links to videos.
Also when you do a print preview there are some instructions for making the lamination cut.
 
LP might be easy after you understand how it works but for me following the video has been my challenge. My eye keeping up to where the cursor is going is where I struggle. It would be better it the took the cursed and made it a highlighter color so easier to follow. Moves so fast its difficult to follow. I find this my biggest problem with wat hi g all the videos with this software.
You can change the speed that your mouse moves across the screen. Go to control panel, click on "MOUSE". Then pointer options. There you can slow it down or have it leave trails behind it as it moves. Or change the mouse into other icons.
 
You can also change the speed of the video. When it is playing, touch the screen and on the progress bar at the bottom, you’ll see a gear icon. Click on that you’ll see the option to change the speed faster or slower.
 
Back
Top