• Are you looking for a coupon code to buy my software? You can get one from lots of 3rd party sites but they won't work. My software never goes on sale and has never been discounted. The only coupon codes that are given is when I give a club presentation and I offer a discount to the attendees. Other than that, everyone pays the same price.

Summary worksheet question

Third_Son

PRO Member
Hi,
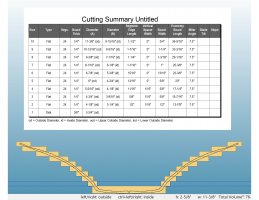
I have been thoroughly evaluating all of the programs in the 30 day trial and have been impressed so far. In WTP is it possible to generate a summary worksheet like the attachment below? It seems like an easier way for me to look at a profile and compare quickly to the segment summary table. Thanks for the great responses to my questions so far.
Paul
Dish.jpg
 
I have good news and bad news for you. First, the bad news.

The first two pieces of software from my hobby business were 3D Design PRO and Woodturner PRO. They were written by my programming partner in 2000. He is a brilliant programmer that worked for me in one of the companies I started. He wrote them using c++, the most powerful language available at the time. In a few years, the demands on his time were so great that he could no longer justify time spent on a hobby business so I bought his half of the company. I wanted to have the program Lamination PRO, though, and because he was no longer available I had to learn a computer language so I could code it myself. Since the new C# language was available that is far simpler to learn (notice I didn’t say simple), I learned it instead. When I needed changes to the programs he wrote, I used contract programmers from India as they were not expensive at the time. Now they won‘t even look at your code without me paying them a retainer fee and then an hourly rate that makes my teeth itch.

So although your request is reasonable, I’d have to sell a LOT of software to pay for it for which I wouldn’t recover even a nickel. My customers made it clear that they don’t want to pay upgrade fees and since it is such a monumental task to manage software with different authorization codes for different versions, there won’t ever be an upgrade charge. It also won’t sell a single addition piece of software.

The good news is that as I look at your plan, I see a wall profile that has an 1/8” wall thickness and if you press the Profile SNAP button, the inside and outside diameters will immediately snap to your profile giving you a turned bowl with a wall width of 1/8” which nobody could turn. If you draw the profile with an appropriate wall width, the Profile SNAP button will do all of the work for you that you had to do manually, row-by-row.

You also have a weak point where your segmented rings meet the base because the glue joint needs to be considerably wider. When you draw the profile, draw the inside to transition to the base giving more glue space between the rings at the bottom part of the bowl. In Segment PRO, this happens automatically for you. Designing this bowl that is closer to a platter than a standard segmented bowl, Woodturner PRO is the correct software to use because there aren’t enough dots in the profile for Segment PRO to get the inside profile as accurate as it is when you draw it yourself in 3D Design Pro.

One more thing on your request - you don’t need to see the summary when you’re looking at the Cutaway View. That view is to show you the bowl in a way you can visually confirm that your wall profile will give you the wall thickness you desire. If you want to see wall thickness measurements, click the toolbar icon that looks like a small glue bottle. It will show you the width of the glued surface.
 
" If you want to see wall thickness measurements, click the toolbar icon that looks like a small glue bottle. It will show you the width of the glued surface." I assume this is in Woodturner Pro as I couldn't find the glue bottle icon in Segment Pro.
 
" If you want to see wall thickness measurements, click the toolbar icon that looks like a small glue bottle. It will show you the width of the glued surface." I assume this is in Woodturner Pro as I couldn't find the glue bottle icon in Segment Pro.
That’s correct. His screen shots show that he is working in Woodturner PRO. There is no such tool in Segment PRO because I think it almost never gets used in Woodturner PRO. Anytime I’ve told users about the tool, they said they didn’t know it was there.
 
That's fine. I think most folks can look at the cutaway and see where the overlap is a bit thin, but I suspect Segment Pro makes even checking it unneeded. In the 6 years I've been turning, I've only made 1 funnel and that one was my fault.
 
I have good news and bad news for you. First, the bad news.

The first two pieces of software from my hobby business were 3D Design PRO and Woodturner PRO. They were written by my programming partner in 2000. He is a brilliant programmer that worked for me in one of the companies I started. He wrote them using c++, the most powerful language available at the time. In a few years, the demands on his time were so great that he could no longer justify time spent on a hobby business so I bought his half of the company. I wanted to have the program Lamination PRO, though, and because he was no longer available I had to learn a computer language so I could code it myself. Since the new C# language was available that is far simpler to learn (notice I didn’t say simple), I learned it instead. When I needed changes to the programs he wrote, I used contract programmers from India as they were not expensive at the time. Now they won‘t even look at your code without me paying them a retainer fee and then an hourly rate that makes my teeth itch.

So although your request is reasonable, I’d have to sell a LOT of software to pay for it for which I wouldn’t recover even a nickel. My customers made it clear that they don’t want to pay upgrade fees and since it is such a monumental task to manage software with different authorization codes for different versions, there won’t ever be an upgrade charge. It also won’t sell a single addition piece of software.

The good news is that as I look at your plan, I see a wall profile that has an 1/8” wall thickness and if you press the Profile SNAP button, the inside and outside diameters will immediately snap to your profile giving you a turned bowl with a wall width of 1/8” which nobody could turn. If you draw the profile with an appropriate wall width, the Profile SNAP button will do all of the work for you that you had to do manually, row-by-row.

You also have a weak point where your segmented rings meet the base because the glue joint needs to be considerably wider. When you draw the profile, draw the inside to transition to the base giving more glue space between the rings at the bottom part of the bowl. In Segment PRO, this happens automatically for you. Designing this bowl that is closer to a platter than a standard segmented bowl, Woodturner PRO is the correct software to use because there aren’t enough dots in the profile for Segment PRO to get the inside profile as accurate as it is when you draw it yourself in 3D Design Pro.

One more thing on your request - you don’t need to see the summary when you’re looking at the Cutaway View. That view is to show you the bowl in a way you can visually confirm that your wall profile will give you the wall thickness you desire. If you want to see wall thickness measurements, click the toolbar icon that looks like a small glue bottle. It will show you the width of the glued surface.
Hi Lloyd,

Thanks for the reply. Yes I understand that the shown design is flawed but the point of the conversation was to discuss if both the spreadsheet and the figure could be incorporated somehow and I am just not seeing it. I wasn't asking you to write more code :).

I wasn't going to build the design I posted but I appreciate your experienced input. As I stated before I am still feeling my way around all of your programs. They are intuitive and I can appreciate the work involved in writing the code.
 
Hi Third Son.
If I understand what you would like is having the summary sheet and an image of the cutaway view to print out on one page within the software.
Like your image in your OP.

Here is a thought. What I have done in the past is to do a screen shot of the cut away view, paste it in Word. Do a screen shot of the summary table and paste in in Word file. Or you could export out the summary sheet as a spreadsheet and import it into Word. Another workaround but it captures what you want to do. Attached is a Word example of just doing screenshots. Took me less than a minute to create


The created Word file can be saved in the Project Window under Supporting Files.
You can also save photos of the project. They are all saved with the WTP file.
=========================================
-- From WTP Help File
Project Window

On the right side of your computer screen is the Project Window. It is a very useful window that allows you an easy way to manage projects. A project may consist of plans, instructions, photos, credits, etc. Instead of having to manage the location of individual files, Woodturner PRO maintains all element of a project in a single file. You can add or remove elements from a project file and let Woodturner PRO save it to a project file. The Project Window allows you to see all elements of the current project. A plus (+) sign in front of any of the headings in the Project Window indicates that elements exist within that heading. Double-click on the plus or the heading to display its contents. Double-clicking an open heading will hide the contents of that heading.

One of the headings in the Project window is Photos. If you download a project from the Woodturner PRO web site, it will most likely have one or more photos of the finished project

You can add photos to projects you create by right-clicking the heading, select 'Add Photo' and then browse to the location on your disk drive where the photo is located.

Another heading in the Project Window is Plans. All projects must have at least one plan. A plan is simply the contents of the current cutaway view. By default, the name of any new plan is My Plan. You can rename this plan by right-clicking on the plan name and then selecting Rename. Likewise, you can add a new plan to the project by selecting Add Plan from the Project menu. There is no limit as to how many plans may be added to the project.

Another heading is Instructions. A project may have one or more documents containing instructions for the project. Projects provided by Woodturner PRO will always be saved in Adobe's Portable Document Format (.pdf) as this is the most universally available (and free) document viewing software. Double-clicking the name of the instruction document will launch it in a new window.

The Project Window may be viewed or hidden by selecting the appropriate item under the View menu. You can also undock and reposition the window using your computer's mouse.

Before using the software, you should take a minute to Set User Preferences by selecting Options from the File menu.
 

Attachments

  • bowl example.docx
    214.3 KB · Views: 14
Last edited:
Hi Third Son.
If I understand what you would like is having the summary sheet and an image of the cutaway view to print out on one page within the software.
Like your image in your OP.

Here is a thought. What I have done in the past is to do a screen shot of the cut away view, paste it in Word. Do a screen shot of the summary table and paste in in Word file. Or you could export out the summary sheet as a spreadsheet and import it into Word. Another workaround but it captures what you want to do. Attached is a Word example of just doing screenshots. Took me less than a minute to create


The created Word file can be saved in the Project Window under Supporting Files.
You can also save photos of the project. They are all saved with the WTP file.
=========================================
-- From WTP Help File
Project Window

On the right side of your computer screen is the Project Window. It is a very useful window that allows you an easy way to manage projects. A project may consist of plans, instructions, photos, credits, etc. Instead of having to manage the location of individual files, Woodturner PRO maintains all element of a project in a single file. You can add or remove elements from a project file and let Woodturner PRO save it to a project file. The Project Window allows you to see all elements of the current project. A plus (+) sign in front of any of the headings in the Project Window indicates that elements exist within that heading. Double-click on the plus or the heading to display its contents. Double-clicking an open heading will hide the contents of that heading.

One of the headings in the Project window is Photos. If you download a project from the Woodturner PRO web site, it will most likely have one or more photos of the finished project

You can add photos to projects you create by right-clicking the heading, select 'Add Photo' and then browse to the location on your disk drive where the photo is located.

Another heading in the Project Window is Plans. All projects must have at least one plan. A plan is simply the contents of the current cutaway view. By default, the name of any new plan is My Plan. You can rename this plan by right-clicking on the plan name and then selecting Rename. Likewise, you can add a new plan to the project by selecting Add Plan from the Project menu. There is no limit as to how many plans may be added to the project.

Another heading is Instructions. A project may have one or more documents containing instructions for the project. Projects provided by Woodturner PRO will always be saved in Adobe's Portable Document Format (.pdf) as this is the most universally available (and free) document viewing software. Double-clicking the name of the instruction document will launch it in a new window.

The Project Window may be viewed or hidden by selecting the appropriate item under the View menu. You can also undock and reposition the window using your computer's mouse.

Before using the software, you should take a minute to Set User Preferences by selecting Options from the File menu.
That would work for me Mike...I did mine in photoshop. Thanks.
 
Another option for you when using Woodturner PRO - click on the Summary View and then click File > Export to csv and then open that file in Excel. Once you have it in Excel, delete all the columns you don’t need and format the Summary data however you like. Remember that you will ONLY see the Export to csv option when the Summary is displayed.

Then switch to the Cutaway View and take a screen shot and crop as desired. Save it to disk and then import it into Excel. You can also do this with a screenshot of the Bowl View.

I always delete most of the columns and then increase the columns that are left to be large enough that I can pin the page to my bulletin board and still see the data from across the room.
 
Back
Top