• Are you looking for a coupon code to buy my software? You can get one from lots of 3rd party sites but they won't work. My software never goes on sale and has never been discounted. The only coupon codes that are given is when I give a club presentation and I offer a discount to the attendees. Other than that, everyone pays the same price.

Layout of the rings

JonathanKlein

PRO Member
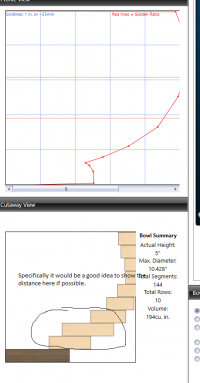
Is there something that shows the distance between each ring to aid in glue-up? In the main imagine of the bowl it does show a layout but there is nothing obvious to me that is showing how far each ring should be from the previous as a glue-up guide to help - or just visually center the ring is the best approach. Maybe this could be an enhancement that give a measurement so that a layout line could be drawn to aid. Thanks
 

Attachments

  • Screenshot 2023-05-26 115644.png
    Screenshot 2023-05-26 115644.png
    47.6 KB · Views: 5
There are a variety of options to centering the rings. A general search on the web will provide links to different methods for centering the rings.
It would not be difficult for someone to export the summary sheet. Take the OD from the upper ring and subtract the OD of the lower rings and divide by 2. that would give you the gap between the two rings. I have used a caliper and set that distance. Using the caliper as a guide you can center the ring.

Here is a general search

You can use the Stomper, use calipers, or a variety of other methods.
fair enough but it would seem very simple for the software to provide the distance for you already. just a suggestion and yes i can export to excel and add such a column. just am trying to learn more about this product and offer up suggestions. thanks.
 
I lay two adjacent rings together and align the segment joints. Then I trace the inside of the bigger ring on the smaller one and the outside of the smaller ring on the bigger one. This shows me where I have to put glue. Do this for each glue joint before assembly.

To assemble every ring concentric to the spindle, put a chuck with Cole jaws into your live center and tailstock, presetting 4 screws in the right holes to grab the next ring to go on. I leave the rubber bumpers off, grabbing the ring with the sharp edges of the bolt heads for a firmer grip. The dents get turned off so it's ok. Lock the headstock temporarily and chuck up the ring to be glued on, apply glue to the joint, and lightly clamp the joint with the tailstock. Now you can rotate the tail chuck and new ring against the building assembly to spread the glue uniformly, line up the desired joint stagger, and make sure the ring is contacting all the way around. Non-parallel faces will fit better in just one place and leave a small gap everywhere else so find the best fit. Once the hew ring is pressed on, release the headstock lock and spin the assembly to check concentricity and to wipe off the glue squeezeout. Snug up the tailstock again and wait just a few minutes for the glue to tack up and repeat the process. The rings will stay completely concentric to the headstock.

Stop every few rings long enough to wipe up any glue squeezeout on the inside of your assembly if you care about it. It's also a good idea to let the assembly dry a few hours before you try to turn the inside if you care about the appearance of the inside.

No measuring and no arithmetic required.
 
Having tried various methods I settled on using the Stomper, where gravity is your friend. Also, I can use the lathe for other things while the glue dries, such as pen turning. It is nice to get perfect alignment but slight misalignment isn't a major problem since it is easily corrected when turning. Get too far off center and pieces might start flying off the lathe! When starting out it pays to use generous wall thickness. With experience you can reduce it leaving less material to remove to achieve a thin wall result.
 
Back
Top