-
Are you looking for a coupon code to buy my software? You can get one from lots of 3rd party sites but they won't work. My software never goes on sale and has never been discounted. The only coupon codes that are given is when I give a club presentation and I offer a discount to the attendees. Other than that, everyone pays the same price.
You are using an out of date browser. It may not display this or other websites correctly.
You should upgrade or use an alternative browser.
You should upgrade or use an alternative browser.
Off Center
- Thread starter TomK
- Start date
Thanks, Tom - I will do that.
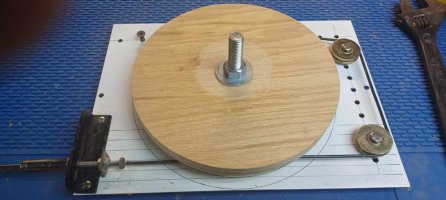
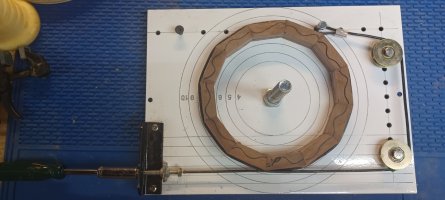
I got tired of the hose clamps for closed segment so I built this fixture. It will accommodate rings up to 10 inches. A #12 stranded wire wraps around the segments. The wire end is soldered in to a 1/4-20 bolt to apply tension with a nut driver.
To take out the excess slack, the wire wraps around two pulleys, the looped end attached to a screw that can be moved to multiple locations.
When all looks good, I clamp it down with the disk, bolt and washer in the center.
I really like the fact that glue will not stick to the wire insulation. At most it might take a quick wipe with a cloth if does.
Works like a charm.
Attachments

Mike Selser
PRO Member
Clever little fixture but i like to glue up all my rings in the same setting. I may have dozen or more rings drying at the same time. A dozen hose clamps takes up a lot less room than a dozen of these fixtures!I got tired of the hose clamps for closed segment so I built this fixture. It will accommodate rings up to 10 inches. A #12 stranded wire wraps around the segments. The wire end is soldered in to a 1/4-20 bolt to apply tension with a nut driver.
To take out the excess slack, the wire wraps around two pulleys, the looped end attached to a screw that can be moved to multiple locations.
When all looks good, I clamp it down with the disk, bolt and washer in the center.
I really like the fact that glue will not stick to the wire insulation. At most it might take a quick wipe with a cloth if does.
Works like a charm.
Lloyd,
Lloyd,
Please see the attached picture of what happens to a segment when it is not correctly distanced from the center. Segment "A" is in the correct position with both edges aligned with the center. Segment B is out of position thus throwing off the adjacent side of the segment to center. This only happens when using a rail for the alignment and not a Seg-Easy Plate. If Segment A width is oversized and you measure the OD rather than the ID it will no longer align with the center if the segment width is oversized. This is why it is imperative that I measure using the ID. It took a while for me to get my head rapped around this, but I now know it’s all about where my measurement is made from. Again, this only holds true when using a rail fixture.
I designed and built the open segment jig myself. The Jig is controlled with a Nema 23 stepper motor and stepper motor driver. All power is supplied with an AC to DC converter 24volt DC power supply. The Power supply also provides the power for the controller. The controller was purchased from World of Ward (Title: Store - Rotary Controller). The controller is programmable for the number of divisions or degrees that you desire. It’s capable of degree movements by as little as 0.01 degree. I can program the controller to move by any degree, wait for 15 seconds (segment glue time) sound a beep, them move to the next position in three seconds (the beep tells me to glue is set and its time let go of the segment before the it turns to the next segment) I use Titebond quick and thick for gluing my segments in place. If i prefer to not use the programmable feature of the controller there is an external button that can be pressed to advance to the programmed degrees.
The housing was built with cherry and oak wood and has a powder coated laminated steel surface on wood (glue drops will not stick to a powder coated surface). The segment location rail is supported by two T-Tracks located on the upright and locked in place by tightening the front knob. The two T-Tracks keep the rail perfectly parallel to the platter when moving. The platter was cut from 1/4-inch aluminum plate, painted red and then laser engraved with degree markings. The platter degrees are primally used only as a reference and as my zero indicator. In the center of the platter has a 1" x 8" threaded screw which is the same as my lathe.
Cheers,
Lloyd,
Please see the attached picture of what happens to a segment when it is not correctly distanced from the center. Segment "A" is in the correct position with both edges aligned with the center. Segment B is out of position thus throwing off the adjacent side of the segment to center. This only happens when using a rail for the alignment and not a Seg-Easy Plate. If Segment A width is oversized and you measure the OD rather than the ID it will no longer align with the center if the segment width is oversized. This is why it is imperative that I measure using the ID. It took a while for me to get my head rapped around this, but I now know it’s all about where my measurement is made from. Again, this only holds true when using a rail fixture.
I designed and built the open segment jig myself. The Jig is controlled with a Nema 23 stepper motor and stepper motor driver. All power is supplied with an AC to DC converter 24volt DC power supply. The Power supply also provides the power for the controller. The controller was purchased from World of Ward (Title: Store - Rotary Controller). The controller is programmable for the number of divisions or degrees that you desire. It’s capable of degree movements by as little as 0.01 degree. I can program the controller to move by any degree, wait for 15 seconds (segment glue time) sound a beep, them move to the next position in three seconds (the beep tells me to glue is set and its time let go of the segment before the it turns to the next segment) I use Titebond quick and thick for gluing my segments in place. If i prefer to not use the programmable feature of the controller there is an external button that can be pressed to advance to the programmed degrees.
The housing was built with cherry and oak wood and has a powder coated laminated steel surface on wood (glue drops will not stick to a powder coated surface). The segment location rail is supported by two T-Tracks located on the upright and locked in place by tightening the front knob. The two T-Tracks keep the rail perfectly parallel to the platter when moving. The platter was cut from 1/4-inch aluminum plate, painted red and then laser engraved with degree markings. The platter degrees are primally used only as a reference and as my zero indicator. In the center of the platter has a 1" x 8" threaded screw which is the same as my lathe.
My segment clamp time is 20 minutes using Titebond II. While one is drying I'm cutting segments for the next ring. I prefer to do it this was because cutting segments get reptitious and that’s when accidents happen to me. I have hose clamps for backups if needed. I also made a 3D printed version of the one Earls Small Segment Shop uses that works equally as well. I guess it's all about the system one developers, what works for one may not work for others.Clever little fixture but i like to glue up all my rings in the same setting. I may have dozen or more rings drying at the same time. A dozen hose clamps takes up a lot less room than a dozen of these fixtures!
Cheers,
Donald Lewis
PRO Member
I 3d print my own segmenting plates. I can use any gap angle and any number of segments within reason. Even 3D printers have limitations. The largest plate I can print is 10 inches. I'm sure Jerry Bennet picked a limited number of options so selling plates didn't become unmanageable. I also use a stomper mounted in a stool. Instead of using weights I have a glue press built over the top of the stomper. I also put 3 set screws through the mount for the stomper that I can adjust pressure on three points of the mount for the stomper to adjust the shaft to be truly square with the the surface. I didn't like the flexibility of the stomper shaft so I replaced mine with a piece of 20 mm aluminum tubing and a 3d printed piston, a plug for the top of the tubing that matched the diameter of the stomper tip and top seal. It works a lot better than the original design. It has very little flex so aligning rings is easier.Ok, for example if you wanted to change the open gap from 4 degrees to 3 degrees on segment rows. How would you do that?
Doug Drury
PRO Member
That's a pretty neat gluing fixture with the wire Tom. I'm curious as to what the maximum number of segments/ring you've glued up with it. I am guessing that the first picture is a top plate to keep everything flat.
Doug Drury
PRO Member
We had a similar discussion regarding gluing and aligning segments back in Dec 2022 on the segmented turners forum. Scott Gordon's post (below) described the problem, and a solution.
Scott's Post
I use a homemade jig whereby I glue on a single segment at a time. I like this approach over the stomper as it gives me more flexibility in terms of the number of segments and degrees in between segments, or even using different settings from row to row. I also use Woodturner Pro and/or Segment Pro for the layout information.
As I was assembling some bowls, I noticed especially as I was putting on the flat ring at the top that there was much less overlap than I was expecting. I then realized that the reason for this is the software reports the diameter of the open segment rings, but that is different than the radius where the segment has to be placed if using the jig I have (or even the Tom Lohman jig). The problem is that the outside segment corners stick out beyond the intended radius. Therefore, if placing the segment at the diameter/radius calculated by the software, the resulting radius will actually be less. The amount of error is going to be greater when the # segments per row is lower and the diameter is larger.
The attached photo shows what is happening. The red line reflects the calculated radius. However, on the horizontal line, there is the additional green segment to the left of the red line showing the part that is not included in the calculation. If you place the segment with the outside corner where the red line ends, you have actually reduced the overall diameter.
This is an easy correction using the lessons of geometry I learned from a few decades ago. (Okay - it was many decades, but the Pythagorean theorem still works!) To correct in Excel, the formula is: =SQRT(([Outside Diameter] / 2)^2 + ([Segment Edge Length] / 2) ^ 2)) This is the good old:
a^2 + b^2 = c^2
where a would be the Outside Diameter divided by 2 and b would be the Segment Edge Length divided by 2. c is then the corrected radius to place the segment which included the green segment of the horizontal line.
Attachments

Radius correction.png