• Are you looking for a coupon code to buy my software? You can get one from lots of 3rd party sites but they won't work. My software never goes on sale and has never been discounted. The only coupon codes that are given is when I give a club presentation and I offer a discount to the attendees. Other than that, everyone pays the same price.

Brick Pattern

Robert Drisaldi

PRO Member
Merry Christmas, everyone!
I'm an "intermediate" segmenter. I would like to learn how to do the brick pattern. Searched YouTube and really could not find anything with detail. Does anyone have a good instructional video in their back pocket?
Thanks
 
Merry Christmas
The "brick pattern" is nothing more than when gluing rings together the top ring segment edge is placed in the center of the bottom ring segment.
WTP and SP shows you the pattern automatically when you build your vessel. This method of glue up adds to the structural strength of the bowl


brick pattern.jpg
 
Last edited:
More specifically, I'm interested in adding lamination between the joints.

There are two methods I have used for adding veneer between the segmented rings.

- cut the veneer into a continuous ring and glue it to the ring. There is no joints to align.

- cut the veneer into segments. I just glue them to the top of the segmented ring so the segment edges align. The next segment ring will follow the brick pattern.

imo, if you glue the veneer in the brick pattern. That is the edge aligns to the middle of the segment you are glueing it to, the brick pattern will not look good.
 
Last edited:
If you want to display the bowl with brick mode, you can do this in Woodturner PRO by simply adding rows between each row and making the new rows 1/8” thick (or whatever you choose). There is a way to do this in both Woodturner PRO and Segment PRO by making a new species that has both species in it. To do this, you have to use a program like Paint which is already on your computer. You first have to decide how much of the thickness is going to be the primary species and how much will be the thin species. For example, let’s say it is 5/8” and 1/8” to give you a 3/4” overall.

In paint, make a rectangle that is 5/8” by 1” (the 1” is not really important). Apply a texture and you can start by using the species file that is in documents\My Segment PRO\species. Above that, add a 1/8” x 1” rectangle and texture it with the other species. Save that file as a .jpg and give it a name such as Maple-Walnut where Maple is the primary species. Then add that image as a Custom Species in Woodturner PRO by clicking File > Options > Custom Species in Woodturner PRO or copy the file to My Segment Pro > Species in Segment PRO. In Segment PRO, change species #1 to that new species and add a 1/8” Vertical Spacer and change segment #7 to Walnut to paint the spacer with that species

In Woodturner PRO, when you add the Custom Species, ignore the height and with fields and click ‘Stretch to Fit’ which will force it to fit the segments in whatever size you add them. If you add the rows as 3/4” rows, and add a vertical spacer of 1/8”, the bowl will display as it will show after you build it.

Lloyd
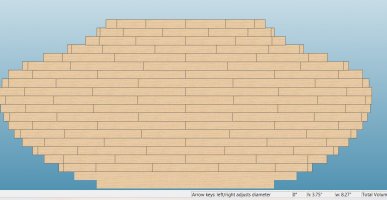
I don't understand the cutting and placement of the vertical spacers.
 
Vertical spacers are simply thin strips of wood with parallel sides that are glued vertically to one edge of each segment. The important thing about vertical spacers is that they need to be crosscut from a board so that when they are glued to the segment, the grain is going around the vessel just like the grain of the segment itself.

Yes, this is gluing end-grain to end-grain, but the strength is that the top and bottom edge of the spacer is flat grain and that is being glued to the flat grain of the ring above and below it. That is where the holding power comes from.
 
Back
Top