• Are you looking for a coupon code to buy my software? You can get one from lots of 3rd party sites but they won't work. My software never goes on sale and has never been discounted. The only coupon codes that are given is when I give a club presentation and I offer a discount to the attendees. Other than that, everyone pays the same price.

Gaps between rings

Brianprigger

PRO Member
I have some gaps from my glueup between the rings. I'm wondering if there are any good suggestions on hiding the gaps to salvage my piece.

Also I see how I messed up gluing the rings so no need to rehash that
 
If the vessel is either still mounted or can be remounted on the lathe, I would contemplate using a point tool or skew to carve a V groove at some or all the glue lines between rings and highlight the glue lines. I would do more than one and even consider some in the rings. The idea is to make it look on purpose. To further highlight the grooves, burn the grooves with a wire. I use nichrome wire from my foam cutter but I've heard that small guitar strings work too.

As with many things, if you can't stop it and can't hide it, celebrate it!
 
I like Ken's idea of the small groove. Besides burning you could do an do an inlay of some accept material. I have even inlayed copper wire, crushed stone, brass metal shavings, etc.
 
To avoid gaps between rings in the future you should glue a ring, let the glue set/dry, mount the vessel on the lathe and sand the top of the mounted ring flat with a sanding disk.

Make sure the bottom of the next ring to be mounted is flat before mounting.

rinse and repeat.
 
I flatten both sides of every ring before I start my glueup so that I don't have to wait for the glue to completely cure between rings. Holding the ring with Cole jaws and just the flathead screws (leave the rubber bumpers off) works really well. How you do it and in what order you use is not important but getting both sides of every ring dead flat is vital.
 
I flatten on both sides before glue-up. I flatten one side on an MDF board with 80 grit and then flatten the other side on a drum sander. Of course, good stock prep will minimize the need for a lot of sanding, and making sure that the ring is as flat as possible while the glue is setting. I use hose clamps to hold rings together, and I clamp the ring tightly between 2 flat surfaces.
 
i used a drum sander and had the rings flattened, i didn't put weight down to close the gaps as it was gluing.

i wound up using sanding sealer then 120gr to 440gr and it filled in all the gaps
 
If you have to put weights on the rung to close the gaps, either the glue was not spread evenly or the ring was not actually flat.

Once I have the glue where I think it's spread out evenly (you know it really isn't), I lightly put the ring face to be glued against the piece and rotate it around a revolution or two until I see even squeezeout all the way around. Then I know it's even. Light pressure will then hold things together until the glue tacks.

If the ring was not flat but weight forces the ring to seat, the glue joint will be in tension then the weight is removed and glue doesn't really like tension and that joint could come apart months or years later.

If the rings were dead flat in their relaxed state, there would not be any gaps. I think your drum sander pushed a warped ring down then smoothed that side. When you turned it over to do the other side, the ring got pushed down again. I was never able to get my drum sander to make truly dead flat rings. It did leave scallops behind where the amount of wood being sanded varied (there's more wood near the leading and trailing edge and less wood halfway through) and did not remove bow from a ring.

I hold each ring in my Cole jaws and only push lightly to seat it. I have a flat sanding disk in a live center in the tailstock whose centerline is offset by two inches from the spindle. The tailstock crank controls the paper pressure. Stop cranking and let the paper "spark out" and you have a dead flat ring surface. Turn the ring over and repeat to get a ring ready for gluing.
 
I use a drum sander to flatten all rings before gluing them up. Use a flat board long enough to support a couple of rings supported with double-faced carpet tape. To keep rings from lifting & giving me an uneven surface from front to back of the ring.
 
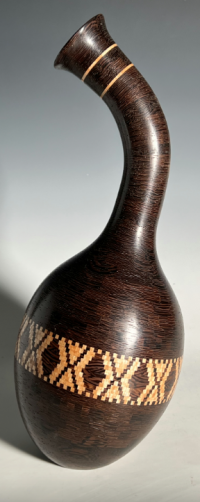
Having flat rings is important to ensure a good glue up, but the rings not only have to be flat, the two flat surfaces have to be parallel or else cumulative error could have you ending up with a glue up that curves. An example of this being done on purpose is one of Russ Braun's pieces pictured below. To ensure a good glue up keeping everything square and in line with the lathe, a piece should always have the last ring added flattened on the lathe to true everything up. Then glue the next flat side of a ring on, flatten on the lathe, repeat, repeat.

An example of non-paralled sided rings glue together to give a curved neck.
1712759521375.png
Evening breeze by Russ Braun
 
Back
Top