You can upgrade to version 1.1.029 for free.Oops..... I forgot to mention I'm using version 1.1.027
See if that fixes your print problem.
You can upgrade to version 1.1.029 for free.Oops..... I forgot to mention I'm using version 1.1.027
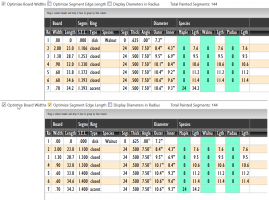
Thanks for the quick response.The lgth (Length) column shows the minimum length of a board that is required to make the number of segments specified in the Species column.
Remember that the length DOES NOT have and additional material for safety/clamping, etc. You must add that amount yourself since it is likely different for every user.
Thanks for the quick response.
After looking more and your response, I think I discovered my problem. I am guessing that the program does not convert those numbers into metric, hence the 1.4" for the padauk is pretty close to 40.8mm S.E.L number
Is this correct?
Thanks again for the help
Merry Christmas
Hello, I'm a brand new user of the tools, purchased today and working on laying out my first bowl. Following these instructions, the ring view PDF results do NOT include cutting instructions for each row at the bottom of each page as described in the tutorial. Is this a bug or am I doing something wrong?This tutorial will help you understand how to get the most out of the Summary View and how to use the Ring View from Segment PRO:
There is no bug in the ring view in SP. SP ring view produces a pdf file. It can be used as a guide for how to layout the pattern you painted during the building of the rings.Hello, I'm a brand new user of the tools, purchased today and working on laying out my first bowl. Following these instructions, the ring view PDF results do NOT include cutting instructions for each row at the bottom of each page as described in the tutorial. Is this a bug or am I doing something wrong?
Version 1.0
Build 1.1.029
The RV Park we're spending the winter in has a woodshop/club and I'm signed up for the segmented bowl class.There is no bug in the ring view in SP. SP ring view produces a pdf file. It can be used as a guide for how to layout the pattern you painted during the building of the rings.
The instructions for cutting is in the summary table. It has all the info you need.
- number of segments per ring
- miter angle
- segment edge length
- width of the board
- number of segments of each of the different species.
- board length is total board length. For example if it says you need a board 24" long to make a 24 segment ring and that ring is made up of 2 species. It will not tell you that you need a board of 12 inches for species 1 and 12 inches for species 2.
Also the board length needed does not take into account a safety fudge factor. I generally add 2 to 3 inches.
WoodTurner Pro ring view provides more detail and an actual size ring when printed out.
imo, any of the software makes the assumption that the user knows about cutting sleds, setting miter angles, setting proper edge length stop block, etc. The summary table is your guide.
Since you are just getting started I would suggest you start with a very simple bowl. Novice setting. Keep the number of rings to a minimum. Learn how to set things up, prepare your stock, cut the segments, glue them together, flatten the rings, stack the rings, and turn the vessel.
There are many videos on the net that show how to build a segment bowl. If you have a woodturning club near you that you can join would also be a great tool to draw on.
Have fun, Ask your questions. Someone will try and give you tips as you proceed to learn.
Years ago I had a fellow woodclub member teach me how to build and turn a segmented vessel. I am always grateful for his time and knowledge.The RV Park we're spending the winter in has a woodshop/club and I'm signed up for the segmented bowl class.

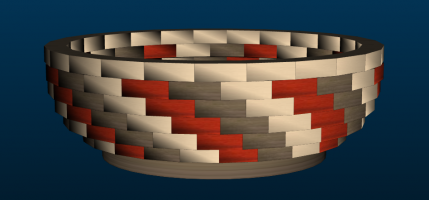
Was thinking of something along these lines for my first bowl... I'm pretty familiar with table saw usage. The shop here has sleds and angle wedges, stop blocks, etc. About a half dozen members are willing to mentor those of us tackling our first bowls...There is no bug in the ring view in SP. SP ring view produces a pdf file. It can be used as a guide for how to layout the pattern you painted during the building of the rings.
The instructions for cutting is in the summary table. It has all the info you need.
- number of segments per ring
- miter angle
- segment edge length
- width of the board
- number of segments of each of the different species.
- board length is total board length. For example if it says you need a board 24" long to make a 24 segment ring and that ring is made up of 2 species. It will not tell you that you need a board of 12 inches for species 1 and 12 inches for species 2.
Also the board length needed does not take into account a safety fudge factor. I generally add 2 to 3 inches.
WoodTurner Pro ring view provides more detail and an actual size ring when printed out.
imo, any of the software makes the assumption that the user knows about cutting sleds, setting miter angles, setting proper edge length stop block, etc. The summary table is your guide.
Since you are just getting started I would suggest you start with a very simple bowl. Novice setting. Keep the number of rings to a minimum. Learn how to set things up, prepare your stock, cut the segments, glue them together, flatten the rings, stack the rings, and turn the vessel.
There are many videos on the net that show how to build a segment bowl. If you have a woodturning club near you that you can join would also be a great tool to draw on.
Have fun, Ask your questions. Someone will try and give you tips as you proceed to learn.

Nice design.Was thinking of something along these lines for my first bowl... I'm pretty familiar with table saw usage. The shop here has sleds and angle wedges, stop blocks, etc. About a half dozen members are willing to mentor those of us tackling our first bowls...
View attachment 5116
Great input, thank you!A little bit about optimizing the board width and SEL fields...
Generally speaking, you can always optimize the board width with the objective of having as few board widths as possible for speed and fewer saw setups. The optimizing rounds up or down to the next decimal place and so sometimes it is wider and sometimes narrower. This affects the Inside Diameter ONLY. If the board width reduces, the inside diameter grows but you should always be building vessels that have enough wall width that you turn wood away and the optimizing makes very little difference other than the time you will save by optimizing.
You can also use the optimizing feature for SEL but not in all cases. If you are making rings with 18 segments or less, you can always use it. But as you get to high-count segmenting (24 segments or more), the SEL is a small number. If you have small SELs and you optimize them, you might have five rings or more that get optimized to the exact same number. This speeds the cutting of segments but those identical rings will make a column of rings. You need to turn the profile from this column and there’s no reason not to do this as long as you can visualize the wall profile before turning it.
I optimize SELs for any ring 18 segments or less and always optimize the board width. However, I do a lot mor optimizing that the software does automatically. I am always looking for ways to reduce the time it takes to cut segments and having fewer board widths is the best way to do this. If I have a number of rings that could be optimized to a single dimensions, regardless of where those rings are positioned, I optimize them to the highest of the five width calculations. This means that the inside diameters of the altered rows will be less than calculated meaning you will need to remove slightly more wood from those rows than the non-altered rows. Removing wood is fast, though, and optimizing will definitely save time.
I do this by one of two ways. First, I print out the Summary and cross out the board width and write in the desired width. Fast and Easy. Second, I export the summary to a spreadsheet and use copy/paste to do the same thing. Not-so-fast but really neat.
My goal is always to have four or less board widths. Certain profiles allow this and others don’t.
This is a GREAT first project. By all means, take advantage of the mentors. There are tips and tricks that all segmenters have to learn and if you can learn them from a mentor on first turnings, you’ll advance far faster than if you have to learn these things on your own. Plus, it makes them feel good that they get to pass on knowledge to others so everybody wins.Was thinking of something along these lines for my first bowl... I'm pretty familiar with table saw usage. The shop here has sleds and angle wedges, stop blocks, etc. About a half dozen members are willing to mentor those of us tackling our first bowls...
View attachment 5116
