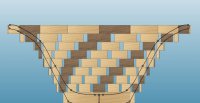
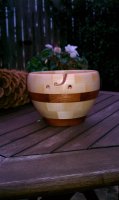
Here's a 3D Design PRO and Woodturner PRO design that is a fun project for those just getting started in open segment turnings - especially if you're using the Stomper.

I designed it for the 18-segment plate and have sized the rings so that all segments in the open segment rows can be cut from just two widths of boards - 1" and 5/8". With the tornado pattern, one of every three segments is walnut and the other two are maple. So cut all material for both species at the same saw setting and when you cut your segments, stack two maple and one walnut and cut three segments at a time. I'm just finishing a video that will shows a jig that will simplify this process and make it very safe so keep an eye out for it.
I wouldn't do any turning at all until you've added the final closed segment ring. This will lock all the earlier open segment rows in place. Then turn the inside first, starting at the top ring and working towards the bottom so that you're leaving the bulk of the glue surface area where it can support the upper rings. Turn away the 5/8" centering hole and sand the inside of the bowl. Finally, turn the outside. If you have a live center cone or plate to provide light pressure from the tailstock, the bowl will turn like it is a closed segment bowl.
I've been saving a big chunk of walnut from the Columbus Day storm of 1964 and plan to make a lot of tornado bowls with various patterns for the 50th anniversary of the storm of the century here in the Pacific Northwest. Perhaps you can locate some blowdown of a similar storm from your area. It will increase the interest of the turnings.
You will need to have 3D Design PRO and Woodturner PRO installed to open the attachments.
Enjoy, and Happy New Year!
Lloyd


