J
John Bracklow
Guest
Thanks for the quick reply, I will check it outJohn, the Osprey is made by Hunter Tools not Carter, link below:
Title: #2 Hunter Osprey Tool - Hunter Tool Systems
Thanks for the quick reply, I will check it outJohn, the Osprey is made by Hunter Tools not Carter, link below:
Title: #2 Hunter Osprey Tool - Hunter Tool Systems
Paul, Apple "Numbers" will read an Excel spreadsheet.Just watched them all Lloyd. Excellent set of videos. Now I have to buy that carbide tool and some plates. Glad I found this site! I'm hoping I can duplicate in Apple's Numbers spreadsheet what you did in Excel because I don't have Excel.
Thanks Glenn, it works perfectly.Paul, Apple "Numbers" will read an Excel spreadsheet.
Hey Lloyd stay out of my head! I just finished my first segmented piece (urn) and was thinking about things to do next. I thought that an open segmented ornament would be great but I have no idea how to do it. And then I get an email with a link to these vids. Thank you very much!Part 1: Design
Did I miss a video of you adding rows? Vid #3 shows the use of the stomper and Vid #4 already has the other rows added.Part 4: Turning and Finishing
Hello everyone! I could use a little help. I am confused on how to join both halves together. Assuming the top half is created the same as the lower half, the last ring of each half is not locked in. So how do you turn the inside of both halves so that you can glue them together? Does the last ring of each half not get turned on the inside?Part 5 - End Finishing Jig
Thanks Mike. I have not seen any comments from different posts that address the top unsupported ring. It just doesn't look like a good idea to me. I wish Lloyd included some video about this. I might just add some solid rings for both halves. We will see.Part 4 vid gives some hints. While I have not made this project the top ring on each half would get turned down to the desired inside diameter.
Similar to any other project made with two halves. The main concern is being careful to do light cuts because the segments are not supported like the other rings.
Good idea! I'll give it a try. Thanks.Maybe putting a hose clamp around the top ring to support the pressure of the cut. Limit the tightness of the clamp so it doesnt break any glue joints.
I try not to turn the top ring because it is not locked in yet. However, sometimes it might be necessary to do it anyway. You can turn that ring with pretty good success as long as your pressure is directed towards the base of the turning. If you turn it where you're turning into the rotation, you more likely to get a minor catch that is big enough to dislodge a segment. If that happens, just glue it back on and use a sanding block to make sure that the tops are all level.Thanks Mike. I have not seen any comments from different posts that address the top unsupported ring. It just doesn't look like a good idea to me. I wish Lloyd included some video about this. I might just add some solid rings for both halves. We will see.
Thank you Lloyd for the detailed explanation. It took me longer, but I was starting to think about board widths when cutting the pieces to begin with. Based on your videos and cut list for this project, what do you suggest for a final wall thickness?I try not to turn the top ring because it is not locked in yet. However, sometimes it might be necessary to do it anyway. You can turn that ring with pretty good success as long as your pressure is directed towards the base of the turning. If you turn it where you're turning into the rotation, you more likely to get a minor catch that is big enough to dislodge a segment. If that happens, just glue it back on and use a sanding block to make sure that the tops are all level.
The better option is this - the outside diameter of a ring is a function of the SEL length. The inside diameter is a function of the board width. Because you're joining two vessel halves where the diameters of both should be identical and they are at the widest point of the bowl, there should be very little wood to turn away on both the outside and the inside. If it appears that more wood needs to be removed from the inside, you can do that all at once by simply making the board width a little narrower.
The good news is that you are making a totally closed vessel where you can't really see the inside at all. That means that if you do absolutely nothing, nobody will ever know that you didn't turn the inside of those two joining rings. And fortunately, fingers are too large to slide into a gap so there's no way to feel that the inside wasn't turned - especially since there is so little wood to be removed in the first place.
This is not the same for the first few rings, though, because there is a big difference in the inside diameters of those rings and if you didn't turn them, it would likely become a little more obvious. Since the size of the gaps on those early rows are so small, though, even they may not make it obvious that the inside wasn't turned. But what's the fun in that?
Lloyd
Part 4 vid gives some hints. While I have not made this project the top ring on each half would get turned down to the desired inside diameter.
Similar to any other project made with two halves. The main concern is being careful to do light cuts because the segments are not supported like the other rings.
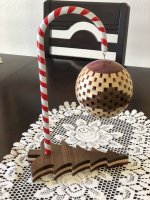
I just want to show you guys my first attempt. Overall I am happy but I need to work on my technique for shaping a sphere. Walnut/cherry 6.5" tall with finial and about 4" wide.There is no one answer that is correct. If you’re just getting started leaving the wall a little thicker is better than ending up with a two-part bowl.
If you don’t mind experimenting, continue thinking do that you can sense the feeling and sound that comes from additional thinking. You’ll learn to know by feel and sound when you’re approaching the danger zone.