• Are you looking for a coupon code to buy my software? You can get one from lots of 3rd party sites but they won't work. My software never goes on sale and has never been discounted. The only coupon codes that are given is when I give a club presentation and I offer a discount to the attendees. Other than that, everyone pays the same price.

New Member Tips

Bluemax

PRO Member
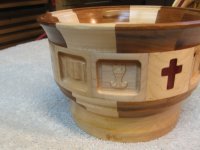
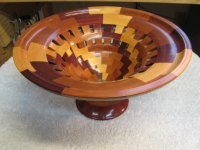
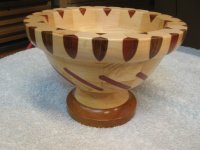
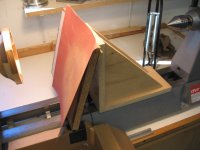
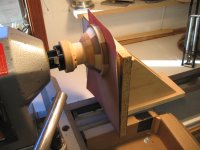
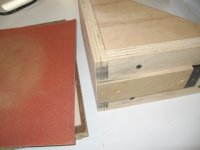
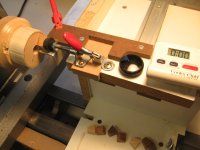
I'm a new member in the group and have a couple suggestions that might help some of the members. I notice most good turners use a lathe tool to face the rings flat on their turnings in prep for the next ring. In doing open segment turning in particular I'm a little leery of popping the segment off when I use that method. I made a angle plate that sits on my lathe bed that is perpendicular and square to the turning. I then mark the face with a pencil and rough or finish sand until pencil marks are gone (rough if it is a closed ring and finish if it is an open ring). This gives me a flat surface without worrying about popping a segment. This probably doesn't concern the good turners in the group but I'm not one of them. Also I use a free program called Greenshot for grabbing parts of a screen that I want to use. It will copy them to clipboard or other programs. I used it to print out the profiles in Seg Pro so I can look at them. I have that copied to Excel spread sheet if anyone is interested and LLoyd doesn't mind if I give the pictures out. I've also added some pictures of some of my work.
 

Attachments

  • IMG_3852.JPG
    IMG_3852.JPG
    664.8 KB · Views: 37
  • IMG_3854.JPG
    IMG_3854.JPG
    775.2 KB · Views: 35
  • IMG_3857.JPG
    IMG_3857.JPG
    737.9 KB · Views: 36
  • IMG_3860.JPG
    IMG_3860.JPG
    853.5 KB · Views: 37
I would like to see some photos of your sanding jig, alone and in use if you have them. We all try to help each other so I'm sure Lloyd won't mind in fact will probably encourage you to post your photos.
 
Yes please post some pictures of your sanding jig. There are newbies here like me that can use all the help they can get
 
I've attached some photos. I think they are self explanatory but if you have questions please ask. It is made of 3/4 inch plywood and a loose piece of particle board to move around with the loose sandpaper. The particle board backer has a piece of sandpaper glued to it just to give it some traction with the sandpaper doing the work (red piece). There is a piece on the bottom that just slides into the lathe base so you can move it back and forth. Make sure everything is as square as you can make it. I also attached a fixture I built to glue open segments on to a piece before I bought Lloyd's set-up. It is very flexible in that it can handle any number of segments per row based on your indexer (I have one with 72 indexes). It also applies pressure to each segment as it is drying (about 2 minutes) so getting the thickness exactly alike isn't as important. Having used it and Lloyd's I prefer his because it is much faster. A row with 12 segments takes about 1/2 hour to glue up with this fixture. I have several photos and I can post those but I think you are better off sticking with the stomper. I'll post the excel spread sheet if Lloyd says it is okay. I don't like posting other people's work unless they approve.
 

Attachments

  • IMG_3889.JPG
    IMG_3889.JPG
    649.8 KB · Views: 55
  • IMG_3890.JPG
    IMG_3890.JPG
    747.2 KB · Views: 54
  • IMG_3891.JPG
    IMG_3891.JPG
    732.8 KB · Views: 50
  • IMG_3843.JPG
    IMG_3843.JPG
    808.7 KB · Views: 52
It looks simple enough. Do you have any problems with it trying to move out of square? Thanks for posting.
 
No . The piece on the bottom sits down in the base of the lathe . That holds it square to the headstock. The brace is 90 Degrees to the lathe face. It works good and quick. You simply slide it into the work.
 
Thanks but I've run into a problem. The upload a file button doesn't recognize an excel file. Not sure how to get around this.
 
Thanks. See if you can download it. I had a couple of my trial ones in the pictures. I hope you don't mind.
Dale
 

Attachments

  • Segment Pro Designs.xls
    1.9 MB · Views: 41
I got the file fine and I think this is a good idea. I currently do something like this for 3D Design PRO and think it would be a good addition to Segment PRO as well. I'll see if I can do this in December where I'll create a realtime catalog that will build a multi-page PDF file that has all of the profiles sorted into categories.

It would be time-consuming to keep this up manually, but should be easy for Segment PRO to do since everything is stored in a relational database and a report writer is available to build the PDF pages.

Thanks for the idea and your work on this. If you don't see this by mid-December, ping me again on it.
 
Your welcome. I'm kind of old school. I like to have pictures of the designs. I printed up the 3D design pro projects so I can look at them quickly. Seemed like the thing to do with Segment Pro. Going back to the sanding fixture. I hope you try this. After I popped off 2 or 3 segments I decided I wasn't a good enough turner to turn them flat. The piece of wood on the bottom that slides in the space of your lathe bed is the key to keeping it square to the headstock. Make it a slip fit and attach it square on the bed.
 
Bluemax.

Nice tip. Looking at your OP and posted images, you are cutting yourself short. Your no novice turner.
I like your sanding jig. I have always used a sanding block larger than the diameter of my bowl to flatten a ring before gluing on the next.

Thanks for the excel file. Good work.
 
mfisher
Thanks. I try. The key is to give your work away to people who aren't turners. They don't tend t criticize free stuff. I have sold a fair amount of my turnings but that isn't why I do it. Like my uncle-in-law I tend to be more of a puttzer than a hard worker. I am more of an engineer than artist( artist being a real stretch).
On the sander. The fixture movable plate that holds the sandpaper doesn't have to be bigger than the work diameter. The paper catches every now and then but it simply puts a small tear in the sandpaper. Also clean the paper( I use a shop duster brush) and work and keep it moving on the piece so it doesn't overheat. On the finer grits of sandpaper I rinse them off in water to remove the dust. You'll find the paper lasts a long time. Also I use a brown paper bag to clean the work and do the final buffing on the work piece before finishing. It has just enough texture to polish the work. It also works good between coats of finish. The best part is its free.
 
Back
Top