In Woodturner Pro is there some way to identify the wood used other than the default wood used in the row. Like in the flower 48-segment, How can someone know the woods used to make the flower?
-
Are you looking for a coupon code to buy my software? You can get one from lots of 3rd party sites but they won't work. My software never goes on sale and has never been discounted. The only coupon codes that are given is when I give a club presentation and I offer a discount to the attendees. Other than that, everyone pays the same price.
You are using an out of date browser. It may not display this or other websites correctly.
You should upgrade or use an alternative browser.
You should upgrade or use an alternative browser.
Identify wood type
- Thread starter Bob Beaupre
- Start date
If you click on the 'Summary View' toolbar button and look at the row in question, the last five columns in the printout show you how many of S1 (Species 1) through S5 (Species 5) are in that row. At the bottom of the Summary View, you'll see a legend as to what Species make up S1 - S5.
I hope that's what you were looking for.
Lloyd
I hope that's what you were looking for.
Lloyd
Glenn McCarron
PRO Member
Are you going to try one of these Bob? I've been looking at these for a bit now on Dennis Edwards website and Tom Lohman's site. I'm not sure I want to do it as an open segment or make it closed segment. Pretty small cuts. I think I will just try cutting and gluing a practice ring first with 48 segments. Could be a challenge.
Thanks LloydIf you click on the 'Summary View' toolbar button and look at the row in question, the last five columns in the printout show you how many of S1 (Species 1) through S5 (Species 5) are in that row. At the bottom of the Summary View, you'll see a legend as to what Species make up S1 - S5.
I hope that's what you were looking for.
Lloyd
I'm looking at trying it as a 24 segment piece and am in the process of laying it out in woodturner pro to see how it looks, that why I had the question on the other wood typesAre you going to try one of these Bob? I've been looking at these for a bit now on Dennis Edwards website and Tom Lohman's site. I'm not sure I want to do it as an open segment or make it closed segment. Pretty small cuts. I think I will just try cutting and gluing a practice ring first with 48 segments. Could be a challenge.
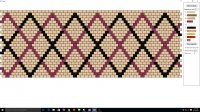
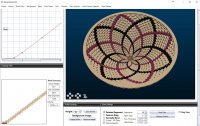
BTW, the new software is coming pretty good but since we're on the subject of painted segments, I just finished adding a 'Diamond Stamp Pad' that lets you click once to draw a series of diamond patterns at whatever size you like. So, for example, if you want to draw a 25-row tall diamond with four repeats, you select a species and make a single click. You can then select a different species and make a second click to draw four more diamonds. Finally, you select the first species again, turn off the Stamp Pad and make two additional clicks to make it into a inter-woven pattern. I've attached both the grid where the painting is done and what the resulting bowl looks like.
Attachments
BTW, the new software is coming pretty good but since we're on the subject of painted segments, I just finished adding a 'Diamond Stamp Pad' that lets you click once to draw a series of diamond patterns at whatever size you like. So, for example, if you want to draw a 25-row tall diamond with four repeats, you select a species and make a single click. You can then select a different species and make a second click to draw four more diamonds. Finally, you select the first species again, turn off the Stamp Pad and make two additional clicks to make it into a inter-woven pattern. I've attached both the grid where the painting is done and what the resulting bowl looks like.
What a tease you are!!
That really looks great.
Just to show you that there really is progress on my new software and that you can do things quickly, I've made a quick video to show you the Diamond Stamp Pad and how it can quickly make a complex inter-woven design. I'm still about six weeks away from it being ready to ship, but I'm targeting late October.
Just to show you that there really is progress on my new software and that you can do things quickly, I've made a quick video to show you the Diamond Stamp Pad and how it can quickly make a complex inter-woven design. I'm still about six weeks away from it being ready to ship, but I'm targeting late October.
Lloyd I was not insinuating that there eally wasn't software. It's that we excited to hear and now see what it can do and what it looks like. This really looks awesome. Thanks for the peek
Bob,
I knew you were kidding and I always return kidding with kidding. :->
Soon, I'll start making more videos so that when it's ready to go, you'll know how to use it. My goal is for this to be easy enough to use that anyone can sit down and just start using it and powerful enough that you can do extensive customization from as few controls as possible.
So your goal is that this new software will eventually replace Woodturner Pro
Yes and no. I plan for it to be able to do about 95% of the bowls that are made daily. Above that, the user interface will have to be much more complex and require switching between screens. My goal is to make segmenters out of woodturners who have never tried segmenting because it 'looks hard'. If I can make it easy, I think we can start to attract more than the 20% that today have tried segmenting. Therefore, it doesn't do staves, compound segments or a few other things - not because I can't do it, but because it defeats my pupose. The more we can make segmenting mainstream, the faster we can grow the community.So your goal is that this new software will eventually replace Woodturner Pro
Woodturner PRO will still be there for people that want to do things outside of the 95% boundary. So this new software is not an upgrade because there isn't one line of code that was taken from it and it has a complete different purpose. It will be so simple to use, though, that if you own both, you will probably use this because you will get to spend your time in the shop instead of at the computer. There are a lot more things I can add without adding a lot of complexity and so there's a lot of room for growth.
Are the files going to be compatible with each other?
Not initially, because the two approaches are so wildly different. With Woodturner PRO, everything is based on individual rows which you create one-at-a-time. With the new, unnamed software, I've separated the physical properties of the bowl from the adornment of the bowl. The adornments can include a feature ring group, painted segments or tornado bands. Once you have your adornment defined, you can save it and apply it to any profile and let the software build the physical bowl. You'll have a library of adornments and a library of profiles - either sample profiles or profiles you make using photos pasted from Internet searches. The adornments can also be shown using different palettes of species. A palette contains 10 species and you can create any palette you like such as economy, vivid, earth tones, exotics, reds, etc. A single click rotates you through the various palettes. By starting with an adornment and swapping profiles and species palettes, you'll have unlimited capacity to to come up with a great design.Are the files going to be compatible with each other?
It may be possible to do export a Woodturner PRO file, though, but since I think it will seldom be necessary, I did not make it part of the architecture. I suspect that there will be pushback on this, but if you need to do something that can only be done in Woodturner PRO, use Woodturner PRO.
I didn't expect it as they look so much different, that's for the explanation.
Glenn McCarron
PRO Member
Thanks Lloyd for the once again amazing demo. I am really looking forward to the new software. I know these flower type bowls are more geared towards straight 45 degree sides but I would like to try it with an ogee shaped bowl. Having the ability to rotate and look inside will give me the confidence to know what I will get in the end. Awesome stuff!
Are you going to try one of these Bob? I've been looking at these for a bit now on Dennis Edwards website and Tom Lohman's site. I'm not sure I want to do it as an open segment or make it closed segment. Pretty small cuts. I think I will just try cutting and gluing a practice ring first with 48 segments. Could be a challenge.
Glenn, Here is what I came up with converting it to a 24 segment open segment vessel. I'm thinking this might be a little more manageable. The next set is going to round up the wood. If I don't blow it up on the lathe I post it here when I get it done. If ou like it give it a try
Attachments
Thanks Lloyd for the once again amazing demo. I am really looking forward to the new software. I know these flower type bowls are more geared towards straight 45 degree sides but I would like to try it with an ogee shaped bowl. Having the ability to rotate and look inside will give me the confidence to know what I will get in the end. Awesome stuff!
I agree whole heartily with Glenn. That 3d view is awesome.
Just to show you that there really is progress on my new software and that you can do things quickly, I've made a quick video to show you the Diamond Stamp Pad and how it can quickly make a complex inter-woven design. I'm still about six weeks away from it being ready to ship, but I'm targeting late October.
Looking forward to see the full demo in Boston
That is what I was thinking as well. Once you have an adornment created and see what it looks like with one profile, why not just swap profiles to see what it looks like in a different shape. The Feature Ring Group (up to five rows), will automatically position itself at the widest point of the new profile, but you can override the position and place it wherever you like.Thanks Lloyd for the once again amazing demo. I am really looking forward to the new software. I know these flower type bowls are more geared towards straight 45 degree sides but I would like to try it with an ogee shaped bowl. Having the ability to rotate and look inside will give me the confidence to know what I will get in the end. Awesome stuff!
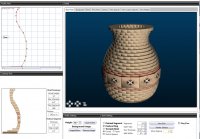
And in other good news, I thought that I would not have the ability to control the positioning of the image on a feature ring segment, but that is no longer the case. I'm now using a projected image which will show you exactly what the image will look like from the outside and from the inside! I've attached a sample. Currently (and perhaps permanently), I stretch the image to fit the outside of the feature row segment. If you use Lamination PRO to create a design that is the correct height and width and then export that image, the inside and outside views will be 100% correct.
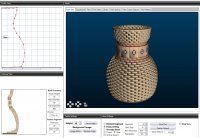
I've uploaded three screenshots that shows the same adornment rendered with three different profiles. I drew each for this demo, but the software will have about 150 samples that will almost all be different from the samples from 3D Design PRO. And, fortunately, the library will show a thumbnail of each profile.
Lloyd
Attachments

Last edited:
WOW you are going to blow people away with this new stuff so cool.That is what I was thinking as well. Once you have an adornment created and see what it looks like with one profile, why not just swap profiles to see what it looks like in a different shape. The Feature Ring Group (up to five rows), will automatically position itself at the widest point of the new profile, but you can override the position and place it wherever you like.
And in other good news, I thought that I would not have the ability to control the positioning of the image on a feature ring segment, but that is no longer the case. I'm now using a projected image which will show you exactly what the image will look like from the outside and from the inside! I've attached a sample. Currently (and perhaps permanently), I stretch the image to fit the outside of the feature row segment. If you use Lamination PRO to create a design that is the correct height and width and then export that image, the inside and outside views will be 100% correct.
I've uploaded three screenshots that shows the same adornment rendered with three different profiles. I drew each for this demo, but the software will have about 150 samples that will almost all be different from the samples from 3D Design PRO. And, fortunately, the library will show a thumbnail of each profile.
Lloyd