Hi Ralph,
At the top of the left column of Woodturner PRO, you'll find the current row number and the type of row which defaults to Flat (or closed segment). If you click on the drop-down arrow of the row type field, you'll see the various types you can select. There are two types that will help you at this point - stave or compound. They are very similar but have different usages. A 'stave' is like the stave of a multi-sided cone. It can be any height and the slope of the stave can be wider or narrower at the top than the bottom. The 'compound' can have the identical properties and appearance of a stave so now let's get into the differences...
Three things are needed in order to create a stave or compound - height, slope and outside diameter of the top. If you know two of these properties, you can solve for the third. With a stave, you specify the height and outside diameter and the software will solve for the slope. With a compound, you specify the slope and height and the software solves for the outside diameter. This means that the correct selection depends on whether you want to specify a specific slope or not. If you want to make a tilted ring that has a specific slope of 40 degrees, you should use the compound ring type and if you don't care what the resulting slope will be, you should select the stave ring type.
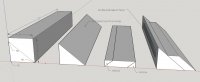
Where this comes into play is the method in which you intend to create your tilted ring. For example, a stave is traditionally made by tilting your saw blade and using a non-standard miter angle. Setting these angles correctly on a saw is complicated and is seldom accurate enough to assemble a stave ring without sanding half rings. The other method (and the one I use whenever possible) uses a 'wedge' approach. With this method, I first determine what slope I want to use. If I want a slope of 40 degrees, I start by getting a 20" (or so) block of scrap wood that is approximately 3" x 3" and cut it lengthwise on my bandsaw with the table tilted at 40 degrees. I now have a triangular shaped wedge that has three angles of 90, 40 and 50 degrees. I double-side tape this wedge to the fence of my miter gauge. Now, if I lay the piece of wood on that wedge, that piece is now tilted 40 degrees from the table top and is in the exact tilt that it will be when glued. Now I can leave my saw blade at 90 degrees to the table and select a preset of 30 degrees for a 12-segment ring. I can now make 12 tilted segments and glue them all at once without having to make half rings. Before cutting these segments, though, I prepare the piece of wood to be used by pre-cutting angles on two opposing sides using the bandsaw or table saw. Now this piece of wood both sits at the proper tilt and has a top and bottom that is parallel to the table. Now I simply cut this piece into segments exactly how I would cut a piece of wood into flat segments. This is also the process I use to cut crown molding on a miter saw where the wood to be cut is prepositioned (tilted) into its intended orientation so that it can be cut with a non-tilted blade. It is a tremendous time saver. I have a few of these sacrificial wedges hanging on my wall and I grab the one I want and select 'compound' as the ring type.
There is one other difference between the stave and compound segments and that is how the length of board is calculated. By definition, a stave is cut lengthwise from a board such as you would do to make staves for a barrel. Coumpound segments, on the other hand, are crosscut from a piece of wood, just as you would do if cutting flat segments. That means that Woodturner PRO calculates the amount of wood required similarly to how it is done for flat rings. The calculation for length of wood required for staves assumes that you are starting with one piece of wood for each stave and so the dimension is the length of the stave times the number of staves per ring.
The bottom line is this - if you want to use the wedge method, select compound. If you don't mind tilting your blade and using a non-standard miter angle, use either stave or compound, but compound will give you the board length calculation in more understandable terms.
I've attached a quick SketchUp drawing to clarify the 'wedge' approach. Please let me know if you still have questions, though.
Lloyd
View attachment 1359