-
Are you looking for a coupon code to buy my software? You can get one from lots of 3rd party sites but they won't work. My software never goes on sale and has never been discounted. The only coupon codes that are given is when I give a club presentation and I offer a discount to the attendees. Other than that, everyone pays the same price.
You are using an out of date browser. It may not display this or other websites correctly.
You should upgrade or use an alternative browser.
You should upgrade or use an alternative browser.
New project
- Thread starter Glenn McCarron
- Start date
I really like the look of the multi-generation pattern being the transition from one species to another.
Glenn McCarron
PRO Member
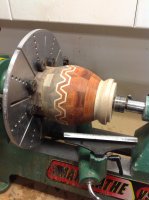
Thank you Lloyd. I do have one more row added but I had to stop and built a steady rest for my lathe. The frame is all done, now I have to build the arms for the wheels. I am just a bit reluctant turning the inside that far out from the chuck without support..
Glenn McCarron
PRO Member
Glenn,
It's time to come clean. Nobody is going to believe this is your first multi-generation project. I mean, I've been following your progress and I'm not sure I believe it. :->
Seriously, you've done a great job and I'm anxious to see where you go from here.
Make sure you put my eagle design somewhere on your list of future projects. Now that you've got the hang of this, it is simply more of the same. You'll find it in your Samples folder in 'My Lamination PRO'. You'll have to resize it as that one was sized for a flat project.
Lloyd
I do have one suggestion you might consider when you make another turning this tall. I would make it in two halves with the bottom half ending at the widest point or in this case, just above the feature ring. Make the other half from the top down, but add a sacrificial ring above the top ring. This will let you turn the inside of the halves when it is easy instead of hard. I'm sorry I'm telling this to you now, but I missed that comment of your earlier email.
I completely turn and sand the insides of the halves when I do this and just use a caliper to make sure the insides where they will be very close. When you glue them together, you will only have to work on the transition area and since nobody's hands can reach it, it isn't very critical. I leave the final outside turning for after the halves are glued together. On my lathe, I have an adapter that lets me mount a faceplate on the live center so that I can turn the glued vessel at high speed with no wobble.
I completely turn and sand the insides of the halves when I do this and just use a caliper to make sure the insides where they will be very close. When you glue them together, you will only have to work on the transition area and since nobody's hands can reach it, it isn't very critical. I leave the final outside turning for after the halves are glued together. On my lathe, I have an adapter that lets me mount a faceplate on the live center so that I can turn the glued vessel at high speed with no wobble.
Glenn McCarron
PRO Member
Thanks Lloyd for your comments and suggestions. I will keep them in mind next time. I guess it's a testament to your website and instructions. I have certainly done a few segmented pieces. My first I did do in two halves and it was quite a bit easier. This piece I was not to concerned about wall thickness as it was to be a usable piece (glass tube for water inside) so I felt it needed a bit of weight to make it stable. I did turn and finish the inside as I added each layer. The steady rest also made it very stable to turn further out.
Glenn
Glenn
I agree with Lloyd. This has been a fun project to watch from start to a great finish. Thanks for posting photos of your journey.
Stuart
Stuart
Glenn McCarron
PRO Member
Hi Stuart, it's been a fun journey and I will certainly try another one sooner than later. I have a local competition coming up in April so I need to do another with higher precision than this as I know the judges and I know in the name of learning they will tear it apart in regards to the misalignments that I have in this.
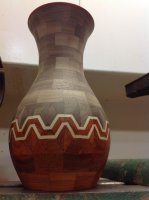
I will get the final pics uploaded by the weekend as I will only do one coat a day with the minx.
Glenn
I will get the final pics uploaded by the weekend as I will only do one coat a day with the minx.
Glenn
Glenn McCarron
PRO Member
Great job, Glenn. Thanks for the nice journey and great destination. Others learned a lot from your photos and inspiration.
Lloyd
Lloyd
Glenn McCarron
PRO Member
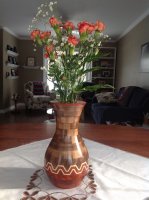
Thanks so much for your comment. It was a fun project and yet a usable one as well. Hasn't been a day yet that there was no cut flowers in it.Glenn.
Your project shows very good craftsmanship. You should be proud.


