• ATTENTION! I will be unable to do any shipments from Saturday, March 4th through March 16th. This includes all Stomper products and backup flash drives. If you choose to place orders for any Stomper products during this time, they will ship in the order they were received. I will continue to answer emails but will not be answering phone calls. I apologize for any inconvenience this may create.
  • Having problems with video with Segment PRO on a new computer? You have an Intel Iris graphics solution and there are serious problems with it. Solution - go to the Drivers page at Intel's website and install their latest driver for your computer. This will fix it. Link: https://www.intel.com/content/www/us/en/download-center/home.html

Wedgie Sled

Brent Dalrymple

PRO Member
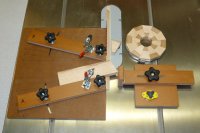
I got interested in Jerry Bennett's Wedgie Sled (plans and videos at segeasy.com) so I decided to give it a try. I purchased a Freud 60T thin kerf crosscut blade to minimize "fuzzies" on the cut wedges. I also made an adjustable stop/gauge to govern the width of the outer part of the segments. The sled is made of 1/2" MDF and the fences are 3/4" MDF, all with a coat of sanding sealer and a coat of poly. Once I finished the sled, I tried it out, making a 7-inch diameter test ring from hard maple and using a 30-60-90 drafting triangle to set the two fences to 30 degrees. The test ring was dead-on perfect and I didn't have to "clean up" the wedges before assembly. For years, I have been cutting wedges using dedicated sleds, one for each angle. I am now sold on the Wedgie Sled and will order a set of Wedgies from segeasy.com. I can recover some space in my shop by getting rid of most of my dedicated sleds.
 

Attachments

  • P1010409.jpg
    P1010409.jpg
    94.4 KB · Views: 276

martyn

PRO Member
yes they are great so simple and accurate it, my first ring was a 48 seg ring and it was spot on
SAM_0658.jpg
 
D

dovetail

Guest
Brent,I have been using this sled for a while now and it is worth it to get the wedges,for fast quick accurate set up.I love it.My other sled is collecting dust in the corner.
 

akuntz

PRO Member
I have a quesstion about the sled. In the video he shows marking the board prior to cutting and the alternating each piece (one piece with mark up the next piece with the mark down). Is this imperative. I made a couple of rings of 32 small pieces and did not do this and things did not seem to line up. I did some 32 piece rings with bigger pieces and it didn't seem to make a diffrence
Is there a spell checker some where on here that I am not seeing
Al
 

stuart johnson

Super Moderator
Staff member
I mark the edge of the board with a straight line and the top (width) with a squiggly mark. When assembling I make sure the squiggle is up and the straight line is alternated like in Jerry's videos. I believe this compensates for any slight angel (tilt) in the blade.
 

Brent Dalrymple

PRO Member
AKuntz: Stuart is absolutely right. The "up" marks always stay up. What alternates is the mark on the side of the board. So you will have that mark on the wide part on one wedge, the narrow part on the next wedge, and so forth.
 

stuart johnson

Super Moderator
Staff member
Not alignment of the miter slot and blade, the sled will handle that but a blade that is say 89.02 instead of 90 degrees.
 

Steve54

PRO Member
Have built my first segeasy sled actually two of them. I have been attempting to purchase the setup wedgies and not able to access the website. Is Jerry Bennett's the only place that these can be bought. Anxious to use the sled. I am not interested in attempting to make my own, seems there would be to much hit and miss.
 

Lloyd Johnson

Administrator
Staff member
I Talked to Jerry's wife earlier today and she said that he was having issues with his web server. Knowing Jerry as I do, insure he'll have it up and running before long.
 
J

Josh Blom

Guest
I have been looking into these for a little bit now and wonder how the wedgies work.... for a 12 pc segment ring (15*), is it just 7.5* off of center or is it 15* off of center? I guess what I am trying to figure out is what is the angle of the inner runners in relation to each-other?
 

Lloyd Johnson

Administrator
Staff member
It's all about the 'complimentary angle'. As long as the board you're cutting has two perfectly parallel sides, the second segment you cut will have a complimentary angle to the first and if you put the two segments together, the angle of the combined two segments will be a perfect 60 degrees. If the actual angle of the first segment was under by .5 degrees, the other will be over by the same amount.
Not only does this work with the angle, it also works with a tilted blade.
In addition to being able to make a segmented ring with no gaps, it is a great way to add interest to a turning. By starting with the wedges out of square by a few degrees, you can make a ring where the lines between segments do not point to the center of the ring. If this ring happens to be at the top of a bowl where there is a large, sweeping curve, the joint lines will appear to be curves instead of straight lines.
So far, I've done very little experimenting with this, but understanding how and why it works really opens up design opportunities.
 

Brent Dalrymple

PRO Member
Josh: For a 12 segment ring, the segment angle is 30 deg. and that is the angle you set between the two fences. They don't have to be exactly 15 deg off of perpendicular to the saw blade to work---the important angle is the angle between the fences. Lloyd has given a good explanation of the outcome if the fences are not at equal angles relative to a perpendicular to the saw blade. But as long as you flip every other piece, the offset on one side of the wedge will be compensated for by the offset on the other side and you still get a perfect ring. This sled works like a charm and will produce wedges that you can clamp together with a band clamp to make a flawless ring, i.e., no gaps, every time.
 
Top