• Are you looking for a coupon code to buy my software? You can get one from lots of 3rd party sites but they won't work. My software never goes on sale and has never been discounted. The only coupon codes that are given is when I give a club presentation and I offer a discount to the attendees. Other than that, everyone pays the same price.

WTP Use of spacers

Bill Nuzzo

PRO Member
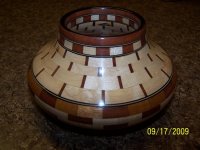
In WTP is there any way to put vertical veneer or small spacers between segments? I like to do this with Southwest designs above and below the accent ring like in the attached photo.

View attachment 341

Bill Nuzzo
 

Attachments

  • = Hopi mini 1.jpg
    = Hopi mini 1.jpg
    90.5 KB · Views: 18
Yes there is.

- Select the ring you want to add spacers between segments.
- On the right hand side of the screen (project property box) you can choose the type of wood for the spacers in the VERTICAL SPACER box. (the type of wood is from your wood species list)
- On the left hand side of the screen (row detail box), there is a VERTICAL SPACER dimension box (just below the insider diameter box). Simple enter the dimension width of your spacers (ex, 1/8th or 0.0125)

"A flat ring, sometimes called a frame miter, is cut from a board laying flat and perpendicular to the saw blade. To create a flat ring, it is necessary to specify the number of segments, the board thickness, the outside diameter and the inside diameter. Additionally, you may specify the width of a vertical spacer such as veneer or thin strips of wood. Once these details have been entered, WOODTurner PRO will calculate width and length of the board which will yield the segments, the angle at which the miter must be set and the edge length of each segment to achieve the desired outside diameter."

Hope this helps.
 
WTP verticle spacers

Dear Mr. Fisher,

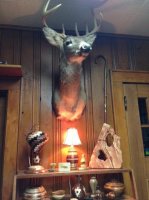
Thank you for your reply. Don't know why I didn't see that. Looked at your excellent work. The picture of your Transition Zig Zag Bowl includes a sculptured redrock similar to one that I bought in Sedona a few years ago. Do you live near there? I have a friend who has a home in Sedona. Here is a picture of my redrock on a display stand with some of my work.
Deer & Display.jpg

Thanks again.

Bill Nuzzo
 
Bill,

There is something I can add with regards to vertical spacers that you may find of interest in a future project. If you create a ring with vertical spacers, click on the Ring View toolbar button and you'll see that the vertical spacer has parallel sides and it has been glued to one end of the segment. Since the spacer has parallel sides, the segment has simply become longer without changing the angle. By gluing it to one end of the segment, though, the spacer does not point to the center of the vessel. The Ring View shows how the segments would be glued together and you can see what I'm talking about. This actually can become noticeable if the row changes to a small diameter.

Now switch that row to a Wheel type and change the Spoke Width to the same Vertical Spacer width you used in the Flat Ring and you'll see that the Spoke (also a vertical spacer) now points directly to the center of the vessel. In this example, the vertical segment is, in essence, cut in two with half glued to each side of the segment. Obviously, you wouldn't do this, but you can accomplish this by simply changing how the segments are glued. In the Flat/Vertical Spacer mode, the left edge of the regular segment is further away from the center than the right side. In the Wheel/Spoke mode, since the segment is centered, both the left and right edges of the regular segment are the identical distance away from the center of the vessel. So the difference is purely the way that you glue the segments and spacers.

So what can you do with this?

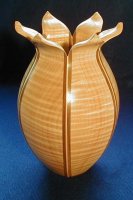
One technique that comes to mind is the Lost Wood technique used by Lowell Converse. This process uses the Wheel configuration and has a large vertical spacer with parallel sides temporarily glued between regular segments (could use double-sided tape or glue with craft paper between the segments/spacer). That whole blank is turned to the desired shape and then taken apart. The spacers are discarded and the remaining staves are glued together. It can look like this:

lostwood.jpg

In addition to this being quite striking, what makes this vessel so interresting is that it has facets that do not make a round vessel and people scratch their head wondering how you used a lathe to make a vessel that isn't round.

I tried this once with moderate success, but it was before I knew much about turning. I think its time to try it again.

Lloyd
 
Vertical spacers

Dear Lloyd,

I can't believe you monitior the forum so closely. You are a busy man. I guess you have a passion. Anyway, thanks for your additional comments on the use of vertical spacers. Here are my thoughts: When I use vertical spacers in a ring, I use the wheel approach. That is, I move the cut segments radially outward to fit the spacers in between, which have parallel sides. Neither edge of the segments is radial, but the centerlines are all radial and the edges are parallel, allowing spacers (whose centerlines are radial) to have parallel sides and greatly simplifying the work. So in my future use of WTP I will specify 'wheels' for those rows having vertical spacers. I don't have to change the way I glue up the rings. [Up until now, to calculate the correct segment lengths of rings having spacers, I had developed my own spreadsheet to do the trig. Now I don't have to use it!]

I didn't quite understand your reference to the lost wood technique of Lowell Converse, but that's OK.

I am now experimenting with tangential placement of the segments (with contrasting spacers) a la Jack Cox, Beyond Basic Turning, Page 93, Gig. 113. The sides of the segments are tangential to an inner circle rather than being radial. My head is aching!

Bill Nuzzo


There is something I can add with [/B]regards to vertical spacers that you may find of interest in a future project. If you create a ring with vertical spacers, click on the Ring View toolbar button and you'll see that the vertical spacer has parallel sides and it has been glued to one end of the segment. Since the spacer has parallel sides, the segment has simply become longer without changing the angle. By gluing it to one end of the segment, though, the spacer does not point to the center of the vessel. The Ring View shows how the segments would be glued together and you can see what I'm talking about. This actually can become noticeable if the row changes to a small diameter.

Now switch that row to a Wheel type and change the Spoke Width to the same Vertical Spacer width you used in the Flat Ring and you'll see that the Spoke (also a vertical spacer) now points directly to the center of the vessel. In this example, the vertical segment is, in essence, cut in two with half glued to each side of the segment. Obviously, you wouldn't do this, but you can accomplish this by simply changing how the segments are glued. In the Flat/Vertical Spacer mode, the left edge of the regular segment is further away from the center than the right side. In the Wheel/Spoke mode, since the segment is centered, both the left and right edges of the regular segment are the identical distance away from the center of the vessel. So the difference is purely the way that you glue the segments and spacers.

So what can you do with this?

One technique that comes to mind is the Lost Wood technique used by Lowell Converse. This process uses the Wheel configuration and has a large vertical spacer with parallel sides temporarily glued between regular segments (could use double-sided tape or glue with craft paper between the segments/spacer). That whole blank is turned to the desired shape and then taken apart. The spacers are discarded and the remaining staves are glued together. It can look like this:

View attachment 347

In addition to this being quite striking, what makes this vessel so interresting is that it has facets that do not make a round vessel and people scratch their head wondering how you used a lathe to make a vessel that isn't round.

I tried this once with moderate success, but it was before I knew much about turning. I think its time to try it again.

Lloyd[/QUOTE]
 
Dear Mr. Fisher,

Thank you for your reply. Don't know why I didn't see that. Looked at your excellent work. The picture of your Transition Zig Zag Bowl includes a sculptured redrock similar to one that I bought in Sedona a few years ago. Do you live near there? I have a friend who has a home in Sedona. Here is a picture of my redrock on a display stand with some of my work.
View attachment 348

Thanks again.

Bill Nuzzo

Hi Bill.

I live in Arizona (Summers Payson, Winters Sun City West but not in Sedona. My wife picked up the rock piece at a art/craft show.
Thanks for the complement. Still learning, as we all are.

By the way, Sun City West has one of the best woodworking shops around. 7,000 sqft building. Every machine and tool you can think of. All for $25/year membership

http://www.scwwoodshop.com/

http://www.scwwoodshop.com/turning/segmented_bowls/fisher.html


Glad to see this forum being used. imo, WTP is a great software for designing segmented bowls.
 
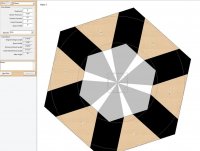
Here's an example of using the Wheel ring type for a Lost Wood turning.

LostWood2.jpg

This vessel would be made from staves and it is six sided with spokes. The six sides have 30 degree angles which the standard cutting angle for six-sided vessels. The spokes (shown in black) would be two inches wide, rectangular and the exact height of the staves. These 12 pieces would be glued together with craft paper to allow it to be separated later to form a 12 sided cylinder. You then put a steel band around the top and bottom of the cylinder and mount this on your lathe. You now turn the inside and outside of the vessel as you would any other segmented vessel.

When you're done turning and sanding it, the 12 pieces of wood are separated and the spokes are discarded. The remaining six pieces are then glued together, perhaps with vertical spacers as Lowell did and you have a Lost Wood vessel with six fairly flat sides.

The good thing about this technique is that there is nobody that I know of that is currently doing it which is surprising, because it isn't particularly difficult.

Anyway, one more thing to put on the 'things I'd like to try' list.

Lloyd
 
I don't often use WTP, and have to relearn it each time. Moving your question 90 degrees, how do I show horizontal veneer spacers between rows??
David
 
Back
Top