-
Are you looking for a coupon code to buy my software? You can get one from lots of 3rd party sites but they won't work. My software never goes on sale and has never been discounted. The only coupon codes that are given is when I give a club presentation and I offer a discount to the attendees. Other than that, everyone pays the same price.
You are using an out of date browser. It may not display this or other websites correctly.
You should upgrade or use an alternative browser.
You should upgrade or use an alternative browser.
Looking for info on cutting 5 pointed star "Dallas Cowboy star"
- Thread starter packer34
- Start date
Here is how you can make stars using Lamination PRO and the good thing about this process is that all cuts are made with the same 36 degree angle.
First, make a laminated board from three symmetric strips where strips 1 and 3 are 3/4" maple and the center strip is 3/8" bloodwood. Cut this board into 3/4" strips at 36 degrees and assemble them into a 1st generation chevron board that should look like this:

Now click the 'radial' toolbar button and click the 'Single Strip' radial button in the left column and change the the number of Radial Segments to 5 and your screen should look like this:
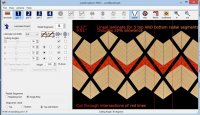
You will need to make your cuts on this board exactly where you see the red lines intersect. This intersection is in the dead center of strips. If you look at a strip, it is a parallelogram. Draw two lines - one from the long corners and another from the short corners of the parallelogram and they will intersect at the center. Your board has to be positioned so that the center of the saw kerf will intersect this point. I recommend making a sled for this project with a miter fence fixed at 36 degrees.
Put your 1st generation board on the sled and position visually it for the first cut and cut through the board and stopping just before you reach the center point. From here, you can tell if you need to shift the board to the left or right and you should be able to position the board perfectly at this point. Now, use my 'Relative Positioning System' approach to hot-glue attach a stop to the sled that is in contact with one of the 'ears' of the board. Complete your first cut and then flip the board edge-to-edge and advance the board to the place where the next ear touches the stop and the board will be in the identical relative position as the last cut. Continue this flipping and cutting until you have five (or more) top and bottom segments. They will be identical since you have started with a symmetric pattern and are cutting through 'Single Strips' instead of 'Repeating Units'.
Now click the 'Circle' toolbar button to see what five of these segments will look like:
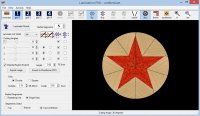
For this image, I checked the 'Clipping Region' checkbox in the left column, the 'Circular' radio button and selected an outside diameter of 2.75". By changing the dimensions of the strips and the Laminate Cut Width, you can make your star any size you like.
I don't think you will be successful making a star on a vessel as small as a cup, though, as the curvature of an item this small will distort your star. I have a suggestion, though - make him a series of coasters instead. You can make them round, whatever size you like and if you switch to solid stock like Corian, you can better match the Cowboy's logo.
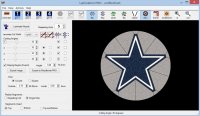
For this image, I started with seven symmetric strips and added two 1/16" strips of cobalt and white to both sides of a wider cobalt center strip and grey outside strips (these are all in your list of species and they all start with the word 'solid'). Your coasters would look like this:
You can read more about my 'Relative Positioning System' by reading the Tips and Tricks pdf file of a presentation I made at the last Segmenting Symposium at the thread at THIS LINK.
If you make a table saw sled for this purpose, you can bang out lots of these coasters in very little time.
Please let me know if you need more descriptions. I've also attached the Lamination PRO file for the Dallas Cowboys Coaster.
Lloyd Johnson
View attachment Dallas Cowboys Coaster.lam
First, make a laminated board from three symmetric strips where strips 1 and 3 are 3/4" maple and the center strip is 3/8" bloodwood. Cut this board into 3/4" strips at 36 degrees and assemble them into a 1st generation chevron board that should look like this:

Now click the 'radial' toolbar button and click the 'Single Strip' radial button in the left column and change the the number of Radial Segments to 5 and your screen should look like this:

You will need to make your cuts on this board exactly where you see the red lines intersect. This intersection is in the dead center of strips. If you look at a strip, it is a parallelogram. Draw two lines - one from the long corners and another from the short corners of the parallelogram and they will intersect at the center. Your board has to be positioned so that the center of the saw kerf will intersect this point. I recommend making a sled for this project with a miter fence fixed at 36 degrees.
Put your 1st generation board on the sled and position visually it for the first cut and cut through the board and stopping just before you reach the center point. From here, you can tell if you need to shift the board to the left or right and you should be able to position the board perfectly at this point. Now, use my 'Relative Positioning System' approach to hot-glue attach a stop to the sled that is in contact with one of the 'ears' of the board. Complete your first cut and then flip the board edge-to-edge and advance the board to the place where the next ear touches the stop and the board will be in the identical relative position as the last cut. Continue this flipping and cutting until you have five (or more) top and bottom segments. They will be identical since you have started with a symmetric pattern and are cutting through 'Single Strips' instead of 'Repeating Units'.
Now click the 'Circle' toolbar button to see what five of these segments will look like:

For this image, I checked the 'Clipping Region' checkbox in the left column, the 'Circular' radio button and selected an outside diameter of 2.75". By changing the dimensions of the strips and the Laminate Cut Width, you can make your star any size you like.
I don't think you will be successful making a star on a vessel as small as a cup, though, as the curvature of an item this small will distort your star. I have a suggestion, though - make him a series of coasters instead. You can make them round, whatever size you like and if you switch to solid stock like Corian, you can better match the Cowboy's logo.
For this image, I started with seven symmetric strips and added two 1/16" strips of cobalt and white to both sides of a wider cobalt center strip and grey outside strips (these are all in your list of species and they all start with the word 'solid'). Your coasters would look like this:

You can read more about my 'Relative Positioning System' by reading the Tips and Tricks pdf file of a presentation I made at the last Segmenting Symposium at the thread at THIS LINK.
If you make a table saw sled for this purpose, you can bang out lots of these coasters in very little time.
Please let me know if you need more descriptions. I've also attached the Lamination PRO file for the Dallas Cowboys Coaster.
Lloyd Johnson
View attachment Dallas Cowboys Coaster.lam
I have a copy of a five star from Jointech that might work for you.
http://lignumturner.com/Star.pdf
http://lignumturner.com/Star.pdf
I'm sorry, but I didn't see your earlier post. You have done it correctly, as far as I can tell. When you use the half repeating unit method, you don't have much wood to work with outside of the star design as the cross cuts run into each other.
Also,in a perfect world where all cuts are made perfectly (yeah, right), the top and bottom segments should be identical. In reality, though, they seldom are identical. Whenever I make a half-repeating-unit design, I always make twice as many as I need and make the designs only using top segments and only using bottom segments. This removes a pretty significant source of errors.
if you need more wood around the star, you can switch to a design that uses full units. When I get home this evening, I'll upload some pictures showing that method.
lloyd
I think you did great, Brad. This is not an easy thing to do as there are a LOT of variables. A little more practice, though, and you'll have it nailed.

